
Whether you’re a seasoned mechanic or new to auto repair, draining and filling your vehicle’s air conditioning system can seem intimidating. AC systems operate under extremely high pressure and contain refrigerant that is both toxic and damaging to the environment if released improperly.
However, with the right knowledge and techniques, even a basic DIYer can complete this important maintenance safely and effectively.
In this blog post on how to drain auto ac system, I’ll break down the entire process step-by-step using simple terms and visual aids to help demystify draining and filling your auto AC system. By the end, you’ll feel confident tackling this job to save money on shop repairs and keep your vehicle’s cool air blowing strong all summer.
What Will You Need?
Before you start, gathering all the necessary tools and materials is important. Here’s a list of what you’ll need for draining your auto AC system:
- Safety goggles
- Gloves (nitrile or latex)
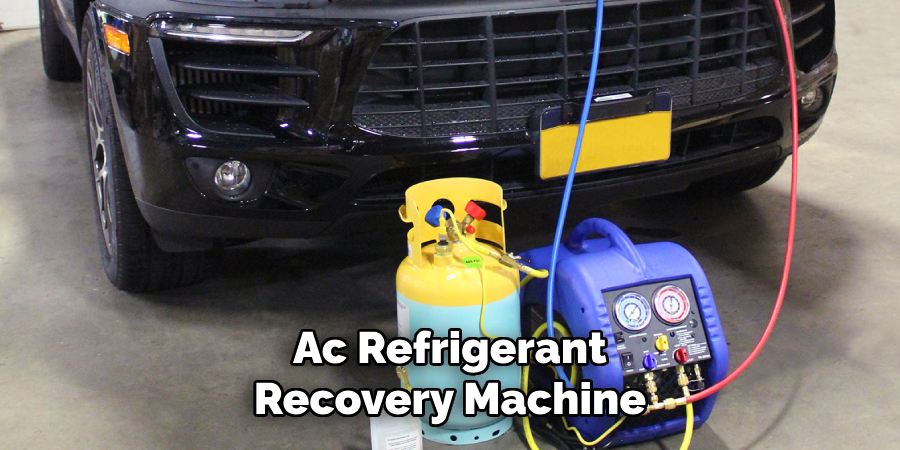
- AC refrigerant recovery machine
- Recovery tank (with proper capacity for your vehicle’s refrigerant type)
- Wrench or socket set
- AC manifold gauge set
- Replacement refrigerant (if needed)
Now that you have everything ready let’s dive into the process.
10 Easy Steps on How to Drain Auto Ac System
Step 1: Prepare Your Workspace
Before beginning any work on your auto AC system, ensuring a safe and clean workspace is essential. Find a well-ventilated area with plenty of space to move around. Lay out your tools neatly so that everything is within easy reach, and ensure that your AC refrigerant recovery machine and recovery tank are in good working order and ready for use.
Safety is paramount when working with potentially hazardous materials like refrigerants, so always wear your safety goggles and gloves.
Step 2: Connect the Recovery Machine
The next step in draining your auto AC system involves connecting the AC refrigerant recovery machine to your vehicle’s AC system. First, ensure the engine is off. Then, using your AC manifold gauge set, connect the low-pressure (blue) hose to the low-pressure service port and the high-pressure (red) hose to the high-pressure service port on your vehicle. These ports are typically found on the AC line between the compressor and the condenser.
Step 3: Start the Recovery Process
Once everything is set up, you can initiate the refrigerant recovery process. Turn on the AC refrigerant recovery machine and let it run until it has recovered all the refrigerant from the AC system. The machine’s gauge will indicate when the system is completely drained. This process may take some time, so be patient and never rush it. Rushing could lead to improper drainage and potential damage to the AC system.
Step 4: Disconnect the Recovery Machine
After the recovery process is complete and all the refrigerant has been safely removed, the next step is to disconnect the AC refrigerant recovery machine from your vehicle. Carefully remove the high-pressure (red) and low-pressure (blue) hoses from the service ports on your vehicle. Remember to shut the valves on the manifold gauges before disconnecting the hoses to prevent any residual refrigerant from escaping.
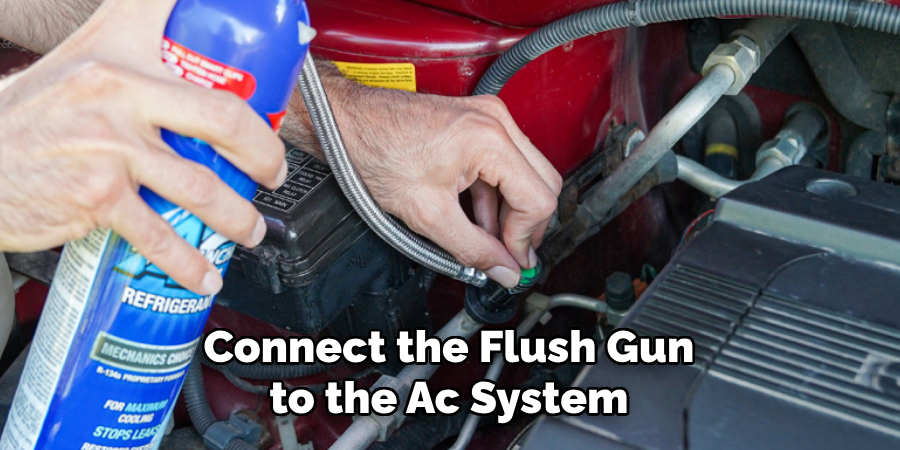
Step 5: Prepare for AC System Flush
Next, you will prepare to flush the AC system. This is an essential step in the process of draining the auto AC system since it allows the removal of any remaining debris or contaminants inside. You will need an AC flushing agent and an AC flush gun to do this. Connect the flush gun to the AC system’s low-pressure service port, ensuring a tight fit to prevent leakage. Once the flush gun is connected correctly, you are ready to start the flushing process.
Step 6: Start the Flushing Process
The next step in draining your auto AC system is initiating flushing. Ensure a collection container is ready to gather the used flushing agent. With your safety goggles and gloves on, trigger the AC flush gun to start flushing the system. Continue this process until all residual debris and contaminants have been flushed out. Once completed, disconnect the AC flush gun from the low-pressure service port.
Step 7: Dry the AC System
After successfully flushing your auto AC system, the next crucial step is to dry it. Moisture within the system can cause serious damage and hamper its efficiency, making drying an indispensable part of the process. For this step, you will need a can of compressed air.
Attach the can of compressed air to the low-pressure service port of your AC system. Then, let the compressed air flow through the system until all moisture is removed. Be patient and thorough during this step, as any residual moisture can negatively affect the operation of your AC system.
Step 8: Preparing for AC System Recharge
Now that your auto AC system is thoroughly dried, you’re ready to prepare it for recharging. This involves ensuring that your AC system is devoid of air, which can be achieved using a vacuum pump. Connect the vacuum pump to your AC system’s low-pressure service port. Once connected, run the pump to create a vacuum in the AC system. Allow the pump to run for approximately 30 minutes to remove all air from the system.
Step 9: Recharge the AC System
Now that the AC system has been fully evacuated from the air, the next step is to recharge it. For this, you will need your replacement refrigerant. Connect the refrigerant can to the low-pressure service port of your AC system. Open the valve on the can and allow the refrigerant to flow into the system.
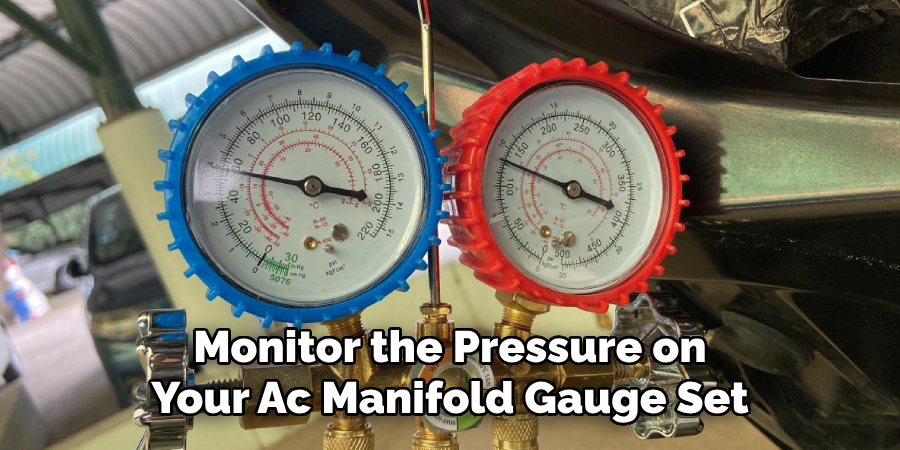
Monitor the pressure on your AC manifold gauge set while filling to ensure you don’t overcharge the system. Only use the type and amount of refrigerant specified in your vehicle’s owner’s manual. Once the system is recharged correctly, disconnect the refrigerant from the service port.
Step 10: Test the AC System
The final step in draining and recharging your auto AC system is to test it. Start your vehicle and turn the AC to the max setting. Allow it to run for a few minutes and check if the AC blows cold air as expected. If the system is not cooling correctly, you may need to repeat the recharge process or consult a professional for possible repairs.
Remember, the aim is to ensure that your AC system is working at its optimal efficiency. Once you’re satisfied with the performance of your AC, congratulate yourself on a job well done!
Following these simple steps, you can drain and recharge your auto AC system. This process is essential for keeping your vehicle’s AC running smoothly and efficiently, so performing regularly is necessary.
5 Additional Tips and Tricks
- Regular Maintenance: To extend the lifespan of your auto AC system, consider regular maintenance checks instead of waiting for a problem to arise. This can prevent major issues down the line, saving time and money.
- Use the Right Tools: Always use the correct tools for each step. This ensures the procedure’s safety and prevents potential damage to your AC system.
- Follow Manufacturer’s Instructions: Always abide by the guidelines in your vehicle’s owner’s manual regarding the type and amount of refrigerant your AC system requires. Improper use of refrigerants can lead to inefficient cooling and potential damage.
- Proper Disposal: Following local regulations for disposing of used refrigerant and flushing agents is important. These substances can harm the environment if not disposed of correctly.
- Seek Professional Help when Necessary: If you encounter any difficulties or the AC system is not working as expected after recharging, seek help from a professional. They have the necessary expertise and equipment to deal with a wide range of AC system problems.

With these additional tips, you can ensure your auto AC system remains in top condition for years to come.
5 Things You Should Avoid
- Ignoring Regular Maintenance: Neglecting regular servicing of your AC system can lead to more severe issues down the line. It’s crucial to have regular check-ups to maintain optimal performance and longevity.
- Using Incorrect or Low-Quality Tools: This can damage your AC system and put your safety at risk. Always make sure to use the right tools designed for the task.
- Skipping Safety Measures: Always wear appropriate safety gear like gloves and safety goggles when working with your auto AC system. Refrigerants can cause skin and eye irritation on contact.
- Improper Handling of Refrigerants: Never release refrigerants into the atmosphere. It’s harmful to the environment and illegal in many regions. Always follow local regulations for proper refrigerant disposal.
- Ignoring Issues or Warning Signs: If your AC system isn’t cooling as effectively as it should or is making unusual noises, don’t ignore these warning signs. Seek professional help if necessary, as these could indicate more serious underlying issues.
By avoiding these common mistakes, you can ensure the proper functioning and longevity of your auto AC system.
Conclusion
In conclusion, how to drain auto AC system is a simple yet crucial step in maintaining the efficiency and longevity of your vehicle. We’ve covered various methods and essential points to remember, such as choosing the right equipment and checking for potential issues. Whether you’re a seasoned mechanic or a DIY enthusiast, following these steps will ensure your car’s AC system stays in top condition.
Hopefully, this guide has been helpful and informative, and you now feel confident in performing the necessary maintenance on your auto AC system. Remember, if you encounter any difficulties or are unsure about any step, it’s always best to seek professional help.
So why wait? Get started on draining your auto AC system today and reap the benefits of a relaxed and comfortable ride during those scorching summer days. Remember to share this post with other car owners who could benefit from this knowledge. Happy driving!