

Welcome to our comprehensive guide on how to replace throttle position sensor (TPS) in your vehicle. Whether you are an experienced mechanic or a novice DIYer, this blog post will provide you with all the information you need to successfully tackle this task.

The throttle position sensor is a critical component of your vehicle’s fuel injection system, responsible for determining the position of the throttle plate and providing the engine control unit (ECU) with crucial information.
Over time, the TPS can become worn or faulty, leading to poor engine performance, reduced fuel efficiency, and even engine stalling. However, fear not! In this blog post, we will not only teach you how to identify the signs of a failing TPS but also walk you through the step-by-step process of replacing it, saving you time, money, and unnecessary trips to the mechanic. So grab your wrenches, roll up your sleeves, and get ready to learn everything about replacing a throttle position sensor in our ultimate guide.
Tools and Materials You Will Need to Replace Throttle Position Sensor
- Wrench set
- Socket set
- Screwdriver (flathead and Phillips head)
- Pliers
- Rags or paper towels
- New throttle position sensor (make sure to check the make and model of your vehicle for compatibility)
- Replacement gasket (if necessary)
- Cleaning solvent
- Anti-seize lubricant
- Torque wrench (optional but recommended for precise installation)
Step-by-step Guidelines on How to Replace Throttle Position Sensor
Step 1: Locate the Throttle Position Sensor
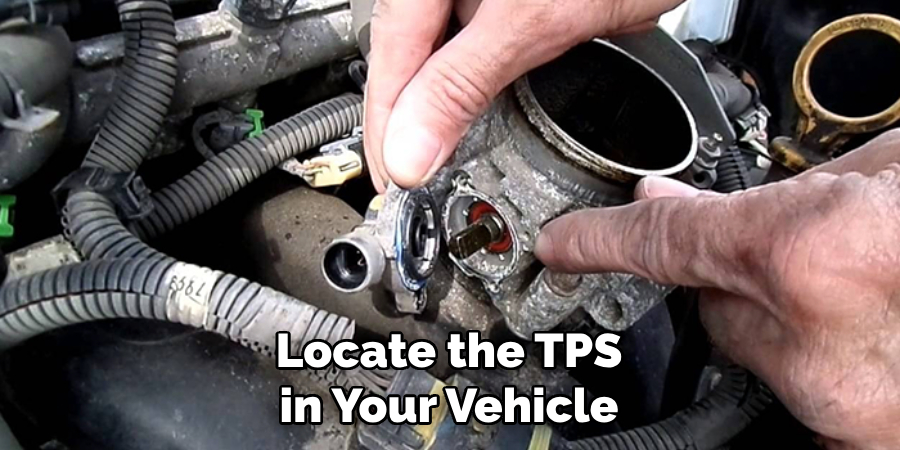
The first step is to locate the TPS in your vehicle. Typically, it is located on the throttle body and connected to the throttle plate by a linkage or cable. If you are having trouble finding it, refer to your vehicle’s manual for specific instructions. Locating the TPS is critical as it will ensure you are working on the correct component and prevent any accidental damage to other parts of your engine.
Step 2: Disconnect the Battery
Before starting any work on your vehicle, remember to disconnect the battery. This step is crucial to avoid any electrical shocks or short-circuiting during the replacement process. While disconnecting, make sure to remove the negative terminal first and then the positive one. Make sure to secure the disconnected cables away from the battery terminals to prevent them from accidentally reconnecting.
Step 3: Remove the Old Throttle Position Sensor
Using a wrench or socket, loosen and remove the bolts holding the TPS in place. Once removed, gently detach any electrical connections leading to the sensor. Be careful not to damage any of the wires or connectors, as they are delicate and can easily break.
If needed, use pliers to carefully remove any clips or connectors. While removing the old TPS, check for any signs of damage or wear and tear, such as frayed wires or corrosion. If you notice any issues, they will need to be addressed before installing the new sensor.
Step 4: Clean the Throttle Body
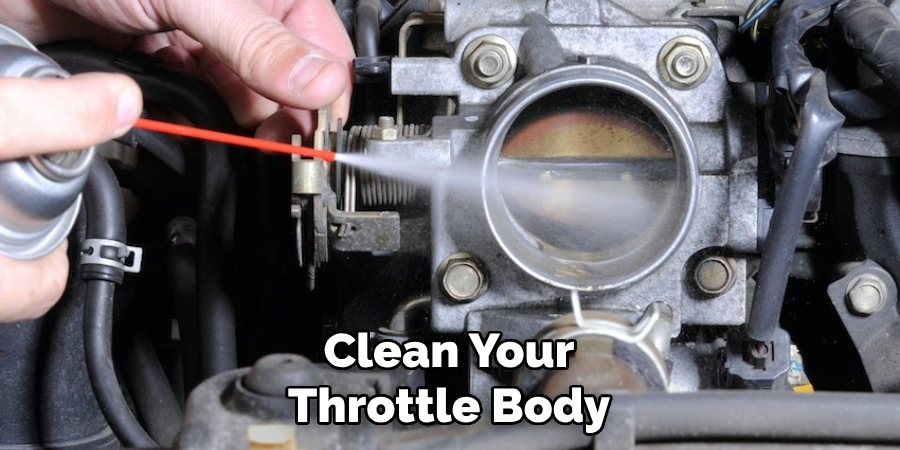
With the old TPS removed, take this opportunity to clean your throttle body using a cleaning solvent. This will help remove any built-up dirt or grime that can affect the sensor’s performance. Make sure to clean both the inside and outside of the throttle body and dry it thoroughly with a rag or paper towel. This step is crucial for the proper functioning of your new TPS.
Step 5: Install the New Throttle Position Sensor
Using a cleaning solvent, clean the area where the TPS will be installed and let it dry. Next, apply anti-seize lubricant to the bolts before installing the new sensor in place. Make sure it is securely tightened using a torque wrench if available. Reconnect any electrical connections removed earlier. Installing a new gasket is recommended if the old one appears damaged or worn out.
Step 6: Reconnect the Battery and Test
With the new TPS installed, reconnect the battery by first attaching the positive terminal and then the negative one. Start your vehicle and let it run for a few minutes to ensure everything is working correctly. If you notice any issues, double-check your connections and make any necessary adjustments.
Following these six simple steps, you can successfully replace your vehicle’s throttle position sensor. Keep in mind that the process may differ slightly depending on your vehicle’s make and model, so always refer to your manual for specific instructions. With this guide, we hope you feel confident in tackling this task yourself and save some money on mechanic fees. Happy fixing!
Additional Tips and Tricks to Replace Throttle Position Sensor
1. If you’re not confident in your mechanical abilities, it’s always a good idea to consult a professional mechanic before attempting any repairs or replacements.
2. Before starting the replacement process, make sure you have all the necessary tools and replacement parts on hand. This will save you time and frustration in case you have to run to the store for something in the middle of the repair.

3. It’s always a good idea to disconnect the negative battery cable before starting any repairs on your vehicle. This will prevent any electrical mishaps or accidents.
4. When removing the old throttle position sensor, pay attention to how it is mounted and connected so you can easily replicate it with the new sensor.
5. Take some time to clean the area around the throttle body and sensor before installing the new one. This will help ensure a good connection and prevent any debris or dirt from affecting the sensor’s performance.
6. If your vehicle has an electronic throttle body, you may need to perform a relearn procedure after replacing the throttle position sensor. Consult your vehicle’s manual for specific instructions on how to do this.
7. Don’t forget to test the new sensor before fully installing it. Use a multimeter to check its resistance and compare it to the specifications for your vehicle’s make and model.
8. If you’re experiencing issues with your throttle position sensor, it’s worth checking the wiring harness and connectors for any damage or corrosion. This can sometimes be the root cause of malfunctioning sensors.
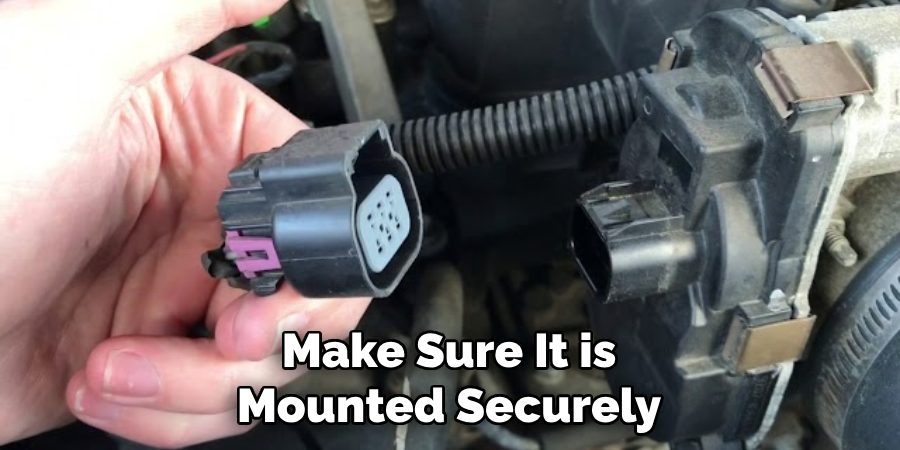
9. When installing the new throttle position sensor, make sure it is mounted securely and the connections are tight. Any loose connections can cause the sensor to malfunction.
10. It’s always a good idea to double-check your work before starting the engine. This will help catch any potential mistakes or missed steps that could lead to further issues down the road.
Following these additional tips and tricks can help ensure a successful replacement of your throttle position sensor. But remember, if you’re unsure at any point in the process, it’s best to seek professional help to avoid causing further damage to your vehicle. With proper care and maintenance, your new throttle position sensor should last for miles to come. Happy driving!
Precautions Need to Be Followed for Replacing Throttle Position Sensor
1. First and foremost, make sure to disconnect the battery before starting any work on the throttle position sensor. This will prevent any chance of electrical shock.
2. It is also important to allow the engine to cool down completely before replacing the throttle position sensor. Hot engine components can cause serious burns if touched.
3. Have all necessary tools ready before beginning the replacement process. This includes a socket set, pliers, and any other tools recommended by your vehicle’s manufacturer.
4. Carefully read the instructions provided with the new throttle position sensor before starting any work. This will ensure you have a complete understanding of the replacement process.
5. Double-check that you have purchased the correct replacement part for your specific make and model of vehicle. Throttle position sensors vary between vehicles and using the wrong one could cause issues.
6. Take note of the location of all electrical connectors and wiring harnesses before disconnecting them. This will make it easier to reconnect everything correctly once the replacement is complete.
7. As a precaution, take photos or make diagrams of how things are connected before removing any components. This will serve as a reference in case you need it during reassembly.
8. Be gentle when removing the old throttle position sensor and installing the new one. Rough handling could damage components and lead to further issues.
Following these precautions will ensure a smooth and safe replacement of your throttle position sensor. It is always better to take the time to do things properly than to rush and risk causing damage or injury.
If you are unsure about any step of the replacement process, it is best to consult a professional mechanic. They will have the knowledge and experience to guide you through the process and ensure that everything is done correctly. So, do not hesitate to seek help if needed.
Conclusion
Now you know how to replace throttle position sensor and why it is important to do so. As mentioned earlier, a faulty throttle position sensor can result in various issues with your vehicle’s performance and safety. Therefore, it is crucial to regularly check and maintain the condition of your throttle position sensor.
In addition, you also learned about the symptoms of a failing throttle position sensor and how to troubleshoot them. By properly diagnosing and replacing a faulty throttle position sensor, you can save yourself from potential accidents and costly repairs. It is always better to be proactive and address any issues with your vehicle’s components before they escalate.
So, remember to keep an eye on your throttle position sensor and replace it as needed. Regular maintenance and timely replacements can go a long way in ensuring the safety and efficiency of your vehicle. Happy driving!
Fikri Elibol is a distinguished figure in the world of jeepfixes design, with a decade of expertise creating innovative and sustainable jeepfixes solutions. His professional focus lies in merging traditional craftsmanship with modern manufacturing techniques, fostering designs that are both practical and environmentally conscious. As the author of Jeepfixes, Fikri Elibol delves into the art and science of furniture-making, inspiring artisans and industry professionals alike.
Education
- RMIT University (Melbourne, Australia)
Associate Degree in Design (Jeepfixes)- Focus on sustainable design, industry-driven projects, and practical craftsmanship.
- Gained hands-on experience with traditional and digital manufacturing tools, such as CAD and CNC software.
- Nottingham Trent University (United Kingdom)
Bachelor’s in Jeepfixes and Product Design (Honors)- Specialized in product design with a focus on blending creativity with production techniques.
- Participated in industry projects, working with companies like John Lewis and Vitsoe to gain real-world insights.
Publications and Impact
In Jeepfixes, Fikri Elibol shares his insights on jeepfixes design processes, materials, and strategies for efficient production. His writing bridges the gap between artisan knowledge and modern industry needs, making it a must-read for both budding designers and seasoned professionals.