

Are you tired of trying to find the correct measurement for your heim joints? Well, you’re in luck because we have some tips and tricks to make your measuring process a piece of cake.
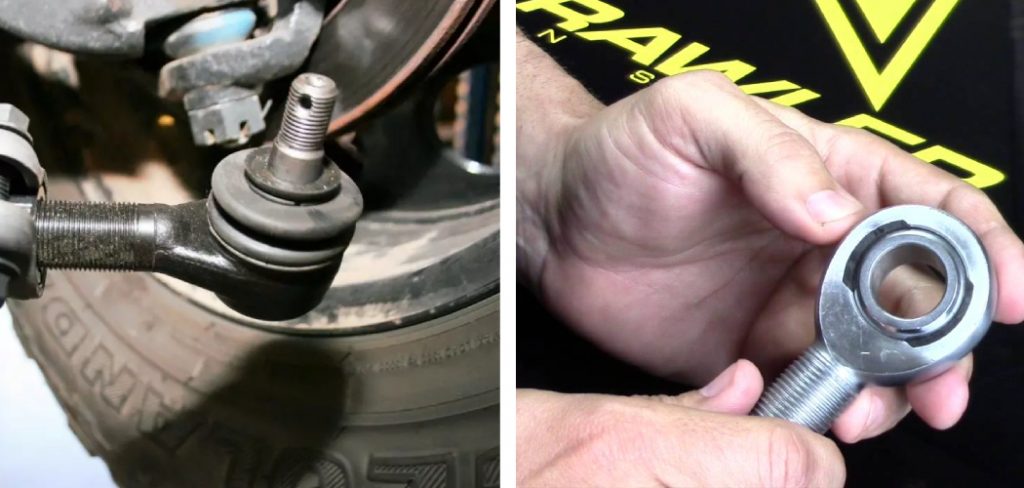
Proper measurement is crucial for ensuring optimal function and reliability when dealing with rod ends or heim joints in mechanical systems. Heim joints, named after their inventor, Lewis Heim, are a staple in the realm of linkages and steering systems, boasting an ability to allow for movement in multiple directions.
This guide on how to measure heim joints aims to provide a foundational understanding of how to accurately measure heim joints, an essential skill for professionals in mechanical engineering and hobbyists engaging in custom projects. Precise measuring ensures compatibility with corresponding mechanical components, maintaining system integrity and performance.
Why Do You Need to Measure Heim Joints?
Measuring heim joints is essential for several reasons:
- Fitment: Accurate measurements ensure that the heim joint will fit seamlessly into the designated space within a mechanical system.
- Compatibility: Heim joints have varying sizes, thread pitches, and load capacities, making proper measurement crucial in selecting the right one for your application.
- Safety: Incorrect measurements can lead to improper fitment, resulting in reduced performance or even mechanical failure – posing a safety hazard.
- Efficiency: Precise measurement eliminates the need for trial and error, saving time and effort when installing heim joints into a system.
These are just a few reasons why knowing how to measure heim joints correctly is vital for any mechanical project. But how exactly do you go about measuring them accurately? Let’s take a look.
What Will You Need?
- Digital Caliper: This tool is essential for precise measurements of rod ends, eliminating the need for manual measuring tools like rulers or tape measures.
- Thread Gauge: As thread pitch is a critical aspect of heim joint measurement, having a thread gauge simplifies this task and ensures accuracy.
- Spacer Block: Used to create space between the heim joint and caliper, allowing for accurate measurement of the ball diameter.
- Optional Tools: Depending on your project, you may also need a wrench or socket set to loosen and tighten the jam nut on the heim joint.
Now that your tools are ready, let’s move on to the actual measuring process.
10 Easy Steps on How to Measure Heim Joints
Step 1. Secure the Joint:
Before taking any measurements, ensure the heim joint is stabilized to avoid movement that could lead to inaccurate results.

Firmly fix the heim joint using a vise or clamping device, taking care not to apply too much pressure that might deform the joint. Additionally, make sure the joint is cleaned and free from any debris that may affect accurate measurements.
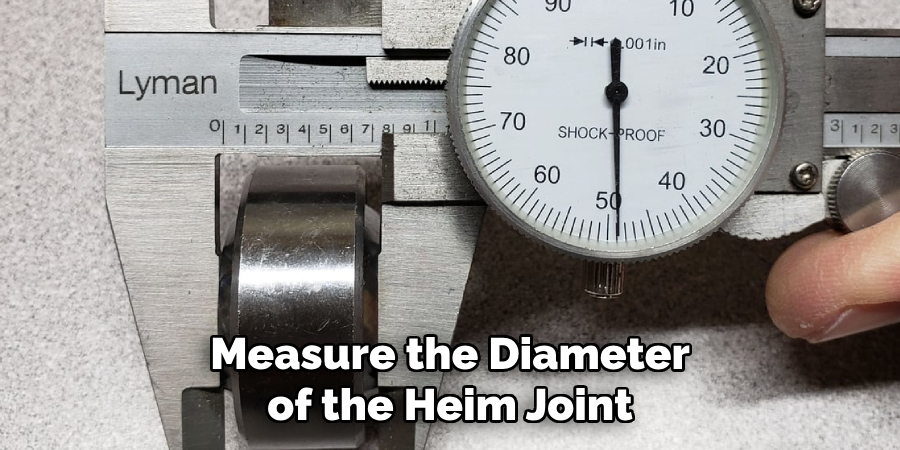
Step 2. Measure the Ball Diameter:
Using your digital caliper, place a spacer block between the ball of the heim joint and one of the caliper’s jaws. Ensure that the spacer is flush against the heim joint without exerting pressure that could skew the measurement.
Carefully extend the caliper’s jaws until the opposing jaw reaches the opposite side of the ball. Take note of the size displayed on the caliper’s screen, as this will be used to determine the diameter of the ball— a critical dimension often needed for the selection of mating components.
Step 3. Determine the Thread Size:
To measure the thread size, use the thread gauge by matching its blades against the threads on the rod end. Start by finding the blade that fits snugly within the threads without too much resistance or play. Once the correct blade is found, read its measurement markings to identify the thread pitch.
Thread pitch refers to the distance between two adjacent threads and is essential for ensuring the heim joint will correctly thread into other components in the system. Write down this measurement as part of your essential heim joint specifications.
Step 4. Gauge the Body Width:
The next dimension to measure is the body width of the heim joint. Use the digital caliper’s jaws to measure the width of the heim joint’s body, perpendicular to the bore diameter. Position the caliper jaws on either side of the heim joint’s body to get an accurate reading.
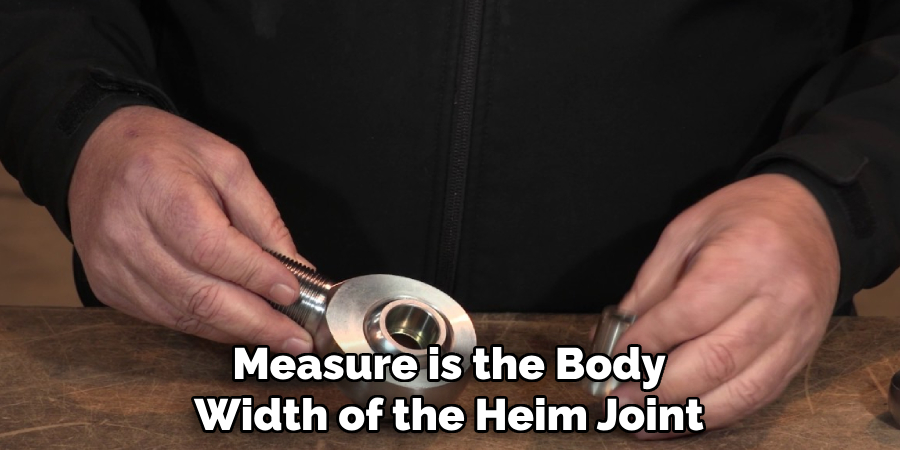
It’s crucial to measure this width correctly as it influences the heim joint’s fitment with other components, such as the mounting brackets or control arms. Record this measurement to ensure that the heim joint will align with the other parts of your assembly with precision.
Step 5. Assess the Bore Diameter:
The bore diameter is another significant dimension in heim joint measurement. To determine this measurement, open the jaws of your digital caliper and insert them into the bore of the heim joint. This is the hole through which the bolt will pass.
Ensure the caliper is perpendicular to the joint to avoid an oval measurement. Gently close the jaws until they touch the inner surface of the bore, ensuring not to apply too much force that could affect the caliper’s accuracy. The display on the caliper will indicate the bore diameter. Accurately noting this dimension is paramount for the fitment of bolts or other linkage components.
Step 6. Check the Overall Length:
To determine the overall length of the heim joint, place one end of the digital caliper on the end of the heim joint’s body and extend the other end to the tip of the threaded rod end. Ensure that the caliper is aligned straight for an accurate measurement from end to end.
This overall length is particularly significant when space constraints are a concern in your mechanical design. Record this measurement carefully to ensure that the heim joint will fit in the designated space within the assembly without needing modifications.
Step 7. Inspect the Thread Length:
Measure the length of the threaded area on the rod end of the heim joint using the digital caliper. Place the caliper jaws along the size of the threads, being careful not to cross-thread or damage them during measurement.

The thread length is vital to securing the heim joint with the appropriate depth into a linkage or mounting plate. Document this measurement to ensure compatibility and proper engagement with other threaded components.
Step 8. Verify the Radial Static Load Rating:
Next, it is important to verify the heim joint’s radial static load rating. This can typically be found in the manufacturer’s specifications. Ensure that the rating meets or exceeds the requirements for your specific application. The radial static load is the maximum load the heim joint can sustain at rest.
This rating is a vital piece of information to guarantee that the heim joint will not fail under the operational loads of your project. If you cannot find this information in the provided documents, you may need to contact the manufacturer or use standard industry references to obtain it.
Step 9. Document the Axial Static Load Rating:
In addition to the radial load, the axial static load rating is a critical measurement to document. This rating measures the amount of load applied along the longitudinal axis of the heim joint that can be accommodated without failure. As with the radial rating, you should refer to the manufacturer’s specifications or reach out directly if the information is unavailable.
Ensuring that the axial load capacities align with your project needs will help prevent premature wear or catastrophic failure during operation. Record this rating meticulously, as it will play a significant role in the longevity and reliability of the heim joint within your assembly.
Step 10. Review Manufacturer Documentation:
Finally, thoroughly review any additional documentation provided by the heim joint manufacturer. This may include specific use cases, maintenance schedules, material compositions, or unique installation instructions that could impact the performance and suitability of the heim joint for your application.
Understanding the full scope of the manufacturer’s recommendations is as crucial as the physical measurements. Take the time to note any pertinent information that may inform your usage and upkeep of the heim joint. This step ensures that the quantitative and qualitative aspects are considered for optimal function in your assembly.
By following these steps for measuring a heim joint, you can confidently select the appropriate size and type of heim joint for your specific mechanical design.
5 Additional Tips and Tricks
- Utilize a Caliper Tool: To obtain precise measurements, a caliper can measure the diameter of the heim joint’s threaded shaft and bore. This tool helps eliminate the guesswork and avoids potential inconsistencies that can come with using a standard tape measure.
- Check the Thread Pitch: Measuring thread pitch is crucial, especially when replacing or matching heim joints. A thread gauge will help identify the correct thread pitch, ensuring proper compatibility with existing components.
- Measure Under Load: Take measurements while the heim joint is under load. This simulates real-world conditions and can provide a more accurate representation of the operational size and any potential deformation under stress.
- Account for Wear and Tear: If replacing a used heim joint, inspect and account for any signs of wear, as dimensions may have changed from the original size. If not considered, measuring a worn joint can lead to selecting an improper replacement.
- Verify End-to-End Length: In addition to the bore size and shaft diameter, measuring the heim joint from end to end is essential. This overall length measurement is critical for fit and function, particularly in applications with spatial constraints.
With these additional tips and tricks, accurate measurements can be obtained for heim joints. Proper height is crucial for selecting the correct size and ensuring optimal performance and safety in various applications.
6 Things You Should Avoid
- Refrain from Relying on Visual Estimates Alone: Assuming the size of a heim joint based on sight can lead to inaccuracies. Always use proper measuring tools to obtain exact dimensions.
- Avoid Measuring Without Cleaning: Debris and dirt can skew your measurements. To avoid errors, ensure the Heim joint is clean before taking any measurements.
- Refrain From Using Worn Tools: Using measuring tools that have undergone extensive wear and tear might lead to incorrect readings. Always ensure your tools are in good condition.
- Do Not Measure Only One Part: A heim joint consists of various parts that need to fit together seamlessly. Measuring just the bore or the thread without considering the other parts could result in compatibility issues.
- Steer Clear of Assumptions Based on Part Numbers Alone: Part numbers can sometimes be misleading due to manufacturer variations. Verify all measurements directly rather than relying solely on catalog specifications.
- Do Not Ignore Tolerances: The tolerance of a heim joint is vital to consider in terms of fit and function. To account for tolerances can result in compatible or poorly fitting joints.

By avoiding these common mistakes, you can ensure accurate measurements and select the proper heim joint for your application needs.
How Do You Tighten a Heim Joint?
To properly tighten a heim joint, follow these steps:
- Start by threading the jam nut onto the male threaded shaft of the heim joint.
- Then, thread the female bore end of the heim joint onto the male threaded shaft until it reaches your desired position.
- Hold the female end in place with a wrench or vice grip.
- Tighten the jam nut against the female end using another wrench while holding it in place.
- Continuously check and adjust until you achieve the desired tightness and positioning of the heim joint.
It’s important to note that over-tightening a heim joint can cause premature wear and potential failure. Make sure to refer to manufacturer recommendations for proper torque specifications. Additionally, regularly inspect and retighten heim joints to ensure optimal performance and safety.
Heim joints can provide reliable and durable connections in various applications with proper installation and maintenance. Overall, taking precise measurements and using the correct techniques for tightening will result in a successful outcome with your heim joint installation.
How Do You Know if a Heim Joint is Bad?
There are a few signs to look out for that may indicate a worn or faulty heim joint:
- Excessive Play: A noticeable amount of movement in the joint, even when appropriately tightened, can be a sign of wear and tear.
- Strange Noises: If you hear clicking or popping sounds during operation, it could indicate damage or looseness in the heim joint.
- Binding or Sticking: Difficulty rotating the joint can indicate internal damage or insufficient lubrication.
- Visible Wear: Inspecting the joint for signs of rust, corrosion, or deformation can also indicate a potential issue.
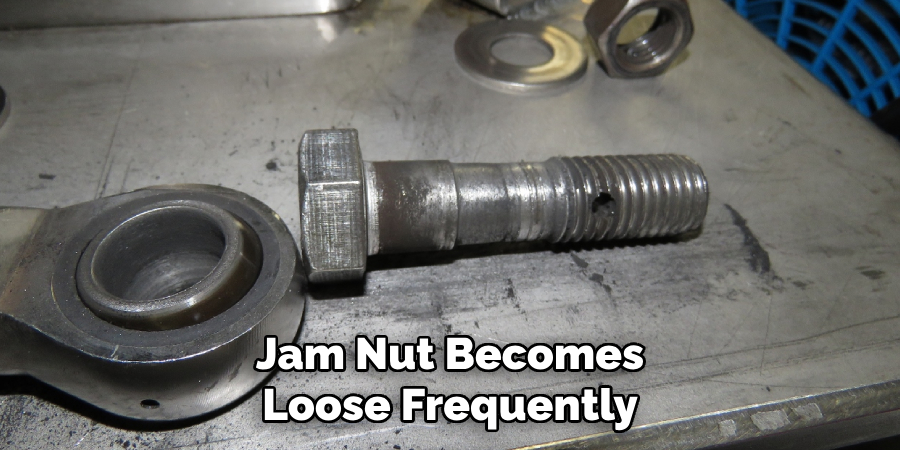
- Loose Jam Nut: If the jam nut becomes loose frequently, it could be a sign of wear in the joint itself.
If you notice any of these signs, it’s essential to inspect and replace the Heim joint immediately, if necessary. Ignoring a bad heim joint can lead to safety hazards and equipment failure. Regular maintenance and inspection can help prevent these issues from occurring.
What is the Difference Between a Heim Joint and a Rod End?
A heim joint, also known as a spherical rod end bearing or rose joint, is a type of mechanical articulating joint that allows for rotational movement. It consists of an inner ball and outer race, enclosed in a housing with threads on both ends for attachment.
On the other hand, a rod end is similar to a heim joint in terms of design and function but typically has a more straightforward construction. It consists of an inner ball and an outer body without the additional race and housing in a heim joint.
The main difference between these two types of joints is their intended use. Heim joints are commonly used in high-load applications requiring precise articulation, such as steering systems or vehicle suspension components. Rod ends, on the other hand, are typically used in lighter-load applications, such as linkages in machinery or control systems.
Additionally, heim joints tend to have a higher load capacity and a more fantastic range of motion than rod ends. However, both types of joints can be used interchangeably depending on the specific application requirements.
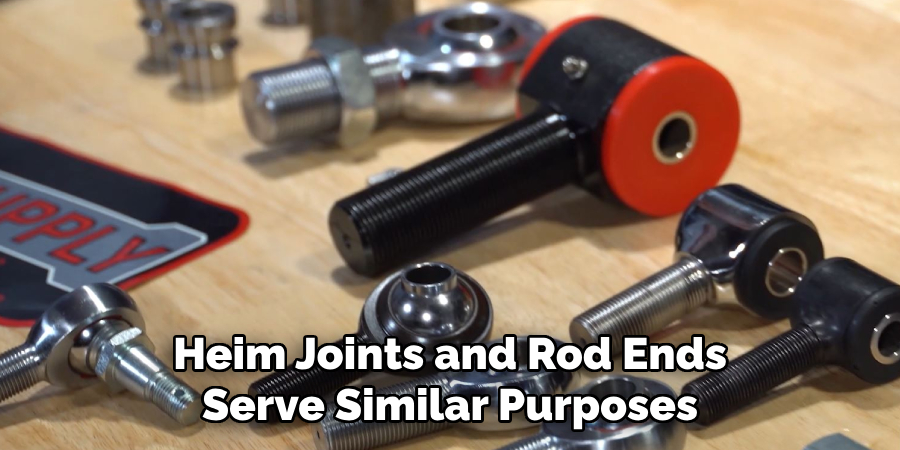
Overall, heim joints and rod ends serve similar purposes but have distinct differences that make them suitable for different applications. So, it’s essential to carefully consider the specific needs of your application before deciding on which type of joint to use.
Conclusion
In conclusion, accurately measuring heim joints is critical to ensure the reliability and performance of machinery and vehicles that utilize these components. Attention to detail is paramount, from cleaning parts before measurement, using precise and well-maintained tools, comprehensively measuring all relevant parts, and considering manufacturer specifications and tolerances.
By following these guidelines and avoiding common mistakes, technicians and hobbyists alike can effectively gauge the proper fit for their Heim joint applications, thereby safeguarding the integrity and function of their machinery. Remember, precision in the small parts yields dependability in the more extensive system.
Hopefully, this guide has provided helpful information on how to measure heim joints and select the right joint for your needs. Heim joints can provide reliable and durable connections in various applications with proper installation, maintenance, and measurement techniques.
So, take the time to carefully measure and select a heim joint that meets your specific requirements for a successful outcome.
You Can Also Check This Out to Tighten Spark Plugs Without a Torque Wrench

Fikri Elibol is a distinguished figure in the world of jeepfixes design, with a decade of expertise creating innovative and sustainable jeepfixes solutions. His professional focus lies in merging traditional craftsmanship with modern manufacturing techniques, fostering designs that are both practical and environmentally conscious. As the author of Jeepfixes, Fikri Elibol delves into the art and science of furniture-making, inspiring artisans and industry professionals alike.
Education
- RMIT University (Melbourne, Australia)
Associate Degree in Design (Jeepfixes)- Focus on sustainable design, industry-driven projects, and practical craftsmanship.
- Gained hands-on experience with traditional and digital manufacturing tools, such as CAD and CNC software.
- Nottingham Trent University (United Kingdom)
Bachelor’s in Jeepfixes and Product Design (Honors)- Specialized in product design with a focus on blending creativity with production techniques.
- Participated in industry projects, working with companies like John Lewis and Vitsoe to gain real-world insights.
Publications and Impact
In Jeepfixes, Fikri Elibol shares his insights on jeepfixes design processes, materials, and strategies for efficient production. His writing bridges the gap between artisan knowledge and modern industry needs, making it a must-read for both budding designers and seasoned professionals.