

Keeping your engine’s intake valves clean is crucial for optimal performance and fuel efficiency. Carbon deposits can accumulate on the intake valves over time, leading to reduced airflow and efficiency. While some methods suggest removing the cylinder head for a thorough cleaning, there are alternative approaches that allow you to clean intake valves without such an extensive procedure. In this article, we’ll explore how to clean intake valves without removing head.
From using specialized cleaning solutions to introducing additives into the fuel system, these methods offer a convenient way to address carbon buildup and maintain the health of your engine. Discovering how to clean intake valves without removing the head empowers car owners to perform essential maintenance tasks efficiently, enhancing engine performance and prolonging the life of critical components.
Assessing the Severity of Carbon Buildup
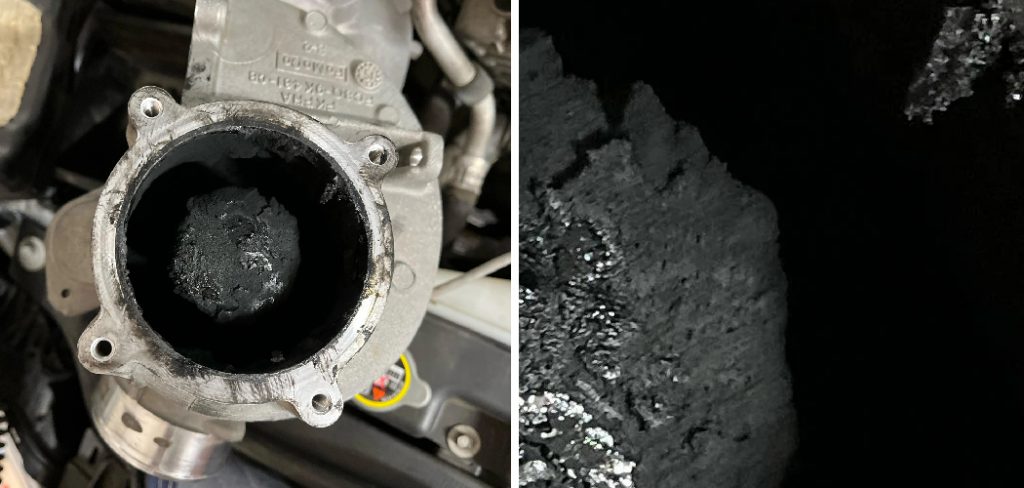
Before you can clean your intake valves, it’s important to assess the severity of the carbon buildup. This buildup over time can lead to reduced engine performance and fuel efficiency. It can be identified by symptoms such as rough idle, engine misfire, reduced acceleration, and increased emissions.
Advanced stages could even cause engine damage. You can use a borescope, a small camera device, inserted through a spark plug hole to inspect your intake valves visually. The carbon deposits will appear as a thick, black coating on the valves. The extent of this coating will help determine the severity of the buildup.
Necessary Tools and Materials
To clean the intake valves without removing the head, you’ll need the following tools and materials:
- A Can of Valve Cleaner: This is a solution designed to break down carbon deposits.
- Fuel System Cleaner: This is an additive introduced to the fuel system to help clean not only the fuel system but also the intake valves.
- Borescope: This is a small camera device that allows you to visually inspect your intake valves.
- Extension Hose: This will allow you to reach the intake valves easily.
- Safety Glasses and Gloves: To protect yourself from potential hazards during the cleaning process.
Remember, always choose high-quality, trusted products for your engine cleaning task. Cheap or substandard products may not provide the desired results and can potentially cause additional problems down the road.
Preparing the Engine
Before you begin the process of cleaning the intake valves, it is essential to prepare your engine accordingly. Start by warming up your engine to operating temperature. This can be done by taking a short drive or idling your car for a few minutes. A warm engine helps in loosening the carbon deposits, making them easier to clean. Once your engine is warm, turn off the ignition and allow it to cool slightly to avoid the risk of burns.
Next, carefully locate the intake valve through the throttle body. Using a borescope can assist in accurately locating the valve. Remove the air intake duct attached to the throttle body to gain access to the valve. Remember to wear safety glasses and gloves throughout this process to protect yourself from any potential hazards.
Keep a container close by to collect any residue or runoff liquid during the cleaning process. Now that your engine is adequately prepared, you’re ready to start the process of cleaning your intake valves without removing the head.
10 Methods How to Clean Intake Valves without Removing Head
1. Use a Fuel Additive
One of the easiest ways to clean intake valves without removing the head is by using a fuel additive. These additives are specially designed to remove carbon buildup and deposits from the intake valves, improving engine performance and fuel efficiency.

2. Try an Intake Valve Cleaner Spray
Intake valve cleaner sprays are another effective method for cleaning intake valves without removing the head. These sprays can be applied directly into the air intake or through a vacuum line, loosening and removing carbon deposits from the valves.
3. Use Water Injection
Water injection is a method that involves spraying water into the combustion chamber while the engine is running. The water turns to steam, which helps to break down carbon deposits on the intake valves.
4. Perform an Induction Cleaning Service
An induction cleaning service is a professional method for cleaning intake valves without removing the head. This process involves using specialized tools and chemicals to clean out carbon buildup from inside the engine, including on the intake valves.
5. Utilize Walnut Blasting
Walnut blasting is another professional method for cleaning intake valves without removing the head. This technique uses crushed walnut shells blasted onto the intake valves with compressed air, effectively removing carbon buildup.
6. Try Hydrogen Peroxide Soak
A hydrogen peroxide soak is a DIY method for cleaning intake valves without removing the head. This involves pouring hydrogen peroxide into a vacuum line while the engine is running, allowing it to soak and loosen carbon deposits on the valves.
7. Use Seafoam Treatment
Seafoam treatment is another popular DIY method for cleaning intake valves without removing the head. This involves adding Seafoam fuel additive into your gas tank, which will help to clean out carbon deposits as you drive your vehicle.
8. Perform Regular Oil Changes
Regular oil changes can also help prevent carbon buildup on your intake valves, as old oil can leave behind sludge and deposits. By changing your oil regularly, you can keep your engine running clean and prevent carbon buildup on your intake valves.
9. Install a Catch Can
A catch can is a device that collects oil vapor and other contaminants before they enter the intake system. By installing a catch can, you can reduce the amount of carbon buildup on your intake valves, keeping them cleaner for longer.
10. Adjust Your Driving Habits
Believe it or not, your driving habits can also play a role in the cleanliness of your intake valves. Aggressive driving and frequent short trips can lead to more carbon buildup on the valves, so adjusting your driving habits may help to prevent this issue.
Applying Intake Valve Cleaner
The first step to cleaning intake valves without removing the head involves using an intake valve cleaner. Choose a high-quality cleaner specifically designed for intake valves to ensure effectiveness. Before applying the cleaner, make sure the engine is turned off, then locate the intake valve in your engine. Spray the cleaner directly onto the valve, making sure you cover all areas.

Allow the cleaner to sit for the time indicated on the product’s packaging, usually around 10-15 minutes. This will allow the cleaner to penetrate and dissolve the build-up of grime and residue. Remember, thoroughness at this stage is key to a successfully cleaned intake valve.
Agitating and Scrubbing
After the cleaner has soaked for the recommended time, the next step is agitating and scrubbing to effectively break down the remaining carbon deposits. With a nylon brush that’s small enough to reach inside, gently scrub the intake valve. This agitation process helps to loosen the stubborn carbon deposits that the cleaner has softened.
Remember, be careful not to be too aggressive as you don’t want to damage the valve. You should pay close attention to heavily built-up areas, ensuring that the cleaner and brushing reach all crevices of the valve. After scrubbing, wipe any loosened grime and cleaner residue with a clean microfiber cloth. Repeat this process if necessary until the valve is thoroughly cleaned.
Removing Loosened Carbon
After thoroughly scrubbing and agitating the carbon deposits, the next step is to remove the loosened grime from the intake valve. This is a critical step in cleaning the intake valves without removing the head. For this, use a shop vacuum with a narrow nozzle attachment to safely and effectively remove the loosened carbon deposits from the intake valve.
Turn on the shop vacuum and carefully place the nozzle into the intake valve. Be sure not to make direct contact with the valve to avoid causing any damage. Move the nozzle around to ensure you are suctioning up all the loosened grime. Once all visible residue has been vacuumed, use a clean microfiber cloth to wipe the valve once more for good measure.
Make sure to inspect the valve closely. If there’s still visible grime or residue, you may need to repeat the cleaning, agitating, and vacuuming process. But if it’s clean, you have successfully completed the intake valve cleaning process without removing the head.
Conclusion
In conclusion, knowing how to clean intake valves without removing head is an important skill for any car owner or mechanic. By following the steps and techniques outlined in this post, you can keep your engine running smoothly and effectively, saving you both time and money.
Regularly cleaning your intake valves not only improves engine performance and fuel efficiency, but it also helps to prevent potential issues such as carbon build-up and misfires. So why wait? Take action now and give your car the TLC it deserves by using these simple methods to clean your intake valves. Your vehicle will thank you in the long run with improved power and a longer lifespan. Remember, prevention is always better than cure when it comes to maintaining your car’s engine.

About
JeepFixes Team is a skilled author for Jeep Fixes, bringing 6 years of expertise in crafting a wide range of jeep fixes. With a strong background in jeep fixes work, JeepFixes Team’s knowledge spans various types of fixtures, from decorative pieces to functional hardware, blending precision with creativity. His passion for jeep fixes and design has made him a trusted resource in the industry.
Professional Focus:
Expert in Jeep Fixes : JeepFixes Team aesthetic specializes in creating durable and innovative jeep fixes, offering both appeal and functionality. His work reflects a deep understanding of jeep fixes techniques and materials.
Sustainability Advocate : He is dedicated to using sustainable practices, ensuring that every fixture is crafted with eco-friendly methods while maintaining high-quality standards.
In his writing for jeep fixes, JeepFixes Team provides valuable insights into the latest trends, techniques, and practical advice for those passionate about jeep fixes, whether they are professionals or DIY enthusiasts. His focus on combining artistry with engineering helps others discover the true potential of jeep in design.