

Are you having trouble braking smoothly and effectively? It may be time to clean your brake pads! Over time, dirt, debris, and oil can build up on your brake pads, affecting their performance. In this guide, we will walk you through the step-by-step process of how to clean brake pads.
Regular maintenance of your brake pads is crucial for ensuring the safety and longevity of your vehicle’s braking system. Clean brake pads can significantly improve your car’s stopping power and prevent squeaking or grinding noises when braking. This guide will walk you through a simple yet effective process for cleaning your brake pads, which is a task that can be accomplished with a few tools and some elbow grease.
Whether you’re an experienced mechanic or a DIY enthusiast, these steps will help you keep your brakes in top condition, ensuring a smoother and safer driving experience.
What are the Benefits of Cleaning Your Brake Pads?
Regularly cleaning your brake pads has several benefits, including:
- Improved Performance: As mentioned earlier, dirt and debris can build upon your brake pads over time, causing them to become less effective. By removing this buildup, you can restore the full stopping power of your brakes.
- Increased Longevity: With regular cleaning and maintenance, your brake pads can last longer, saving you money on costly replacements.
- Prevention of Noise: Dirty brake pads are more likely to produce squeaking or grinding noises when braking, which can be a sign of worn-down brakes. Cleaning them regularly can prevent these noises and indicate any potential issues with your brakes before they become severe.
- Safer Driving: Ensuring your brake pads are clean and functioning correctly makes your driving experience safer for yourself and others on the road.
These benefits make cleaning your brake pads an essential task for any vehicle owner. Now, let’s dive into the step-by-step process of how to clean brake pads.
What Will You Need?
Before we dive into the steps for cleaning your brake pads, let’s make sure you have all the necessary tools and materials on hand. Here is a list of items you will need:
- Jack and jack stands (to lift and support your vehicle)
- Lug wrench (for removing the wheels)
- Brake cleaner spray
- Wire brush
- Clean cloth or paper towels
- Grease or lubricant (optional)
Now that you have all the necessary tools let’s start cleaning your brake pads.
10 Easy Steps on How to Clean Brake Pads
Step 1. Engage the Parking Brake
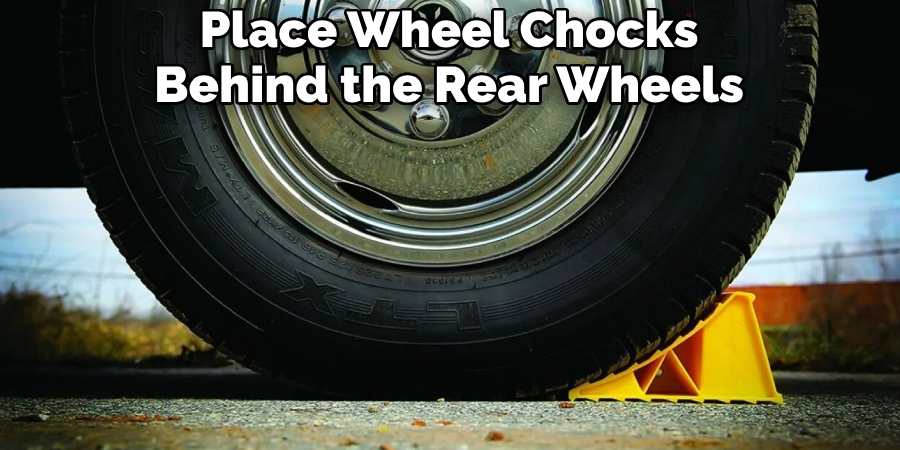
Before lifting your vehicle, it’s vital to ensure it won’t roll or shift. Engage your parking brake fully for safety. This will lock the rear wheels and keep the car stable when you’re working on the front brakes. If your vehicle has a manual transmission, put it in gear to save it from moving. Additionally, place wheel chocks behind the rear wheels to secure your car further.
Step 2. Loosen the Lug Nuts
Using a lug wrench, loosen the lug nuts on your wheels before lifting the vehicle. This will prevent the wheels from spinning and make it easier to remove them later. Do not remove the lug nuts entirely at this stage; just loosen them enough to ensure you can unscrew them by hand after the vehicle is lifted. If you need clarification on the location of your lug nuts, refer to your owner’s manual for guidance.
Step 3. Lift Your Vehicle
Place your jack under one of the vehicle’s designated jack points. Refer to your vehicle’s owner manual to locate these points and ensure that you are positioning the jack correctly. Once in place, raise the car until the wheel is off the ground. Place the jack stand under the car, near the jack point, for extra security, and slowly lower the vehicle onto the stand. Repeat this process for all the wheels, if necessary.
Step 4. Remove the Wheels
Once the vehicle is securely supported on jack stands, unscrew the loosened lug nuts and remove the wheels. This will give you clear access to the brake assembly and allow you to reach the brake pads easily. Place the wheels in a safe area to prevent them from rolling away. As a precaution, you may place them under the vehicle’s frame.
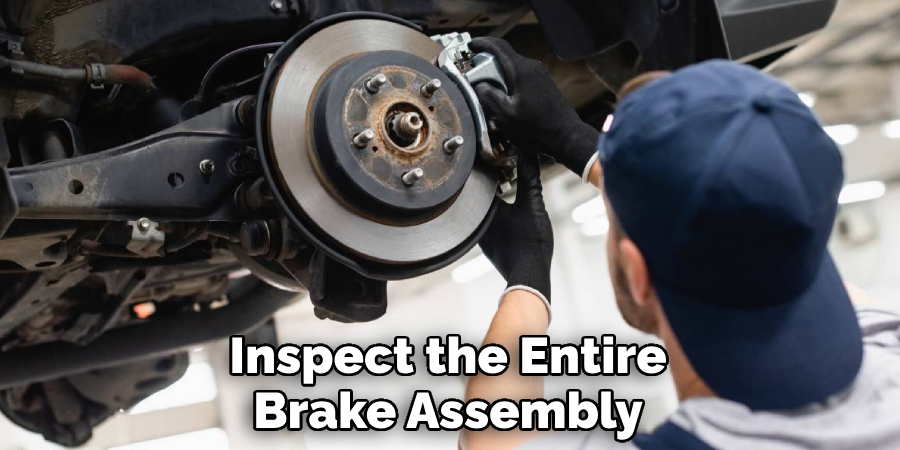
Step 5. Inspect the Brake Assembly
Before proceeding, take a moment to inspect the entire brake assembly visually. Look for any signs of damage, such as cracks or excessive wear on the brake pads, rotors, and calipers. If you notice any issues that require more than cleaning, consider consulting with a professional mechanic. If everything looks in order, proceed to the next step for cleaning.
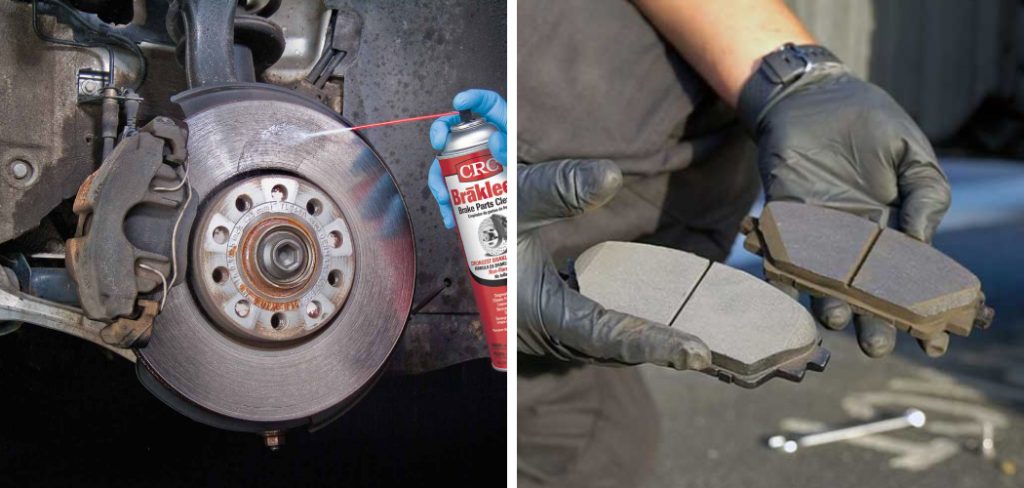
Step 6. Apply Brake Cleaner
With the wheels removed and the brake assembly exposed, it’s time to start cleaning. Take your brake cleaner spray and apply it liberally to the brake pads and surrounding area. Wait for a few minutes to let the cleaner soak in and break down any built-up grime and oil. Be sure to use the cleaner in a well-ventilated area and avoid contact with other vehicle parts, as it can damage painted surfaces.
Step 7. Scrub with a Wire Brush
After allowing the brake cleaner to penetrate the buildup on your brake pads, take your wire brush and scrub the surface of each place. Be thorough yet gentle to avoid damaging the pads. Ensure that you remove all the residue, including brake dust, dirt, and bits of metal. This step is crucial for restoring the proper function of the brake pads and can help eliminate any noise issues associated with dirty brakes.
Step 8. Wipe Clean with a Cloth
Once the brake pads are thoroughly scrubbed, take a clean cloth or paper towels and wipe away any remaining cleaner and loosened debris. You want the pads to be as clean as possible, free from any particles that could compromise their function. Carefully inspect the pads to ensure all grime is removed. This might require additional spraying and scrubbing, depending on the condition of the brake pads.
Step 9. Apply Grease
If your vehicle’s manufacturer recommends, you can apply a thin layer of high-temperature grease or lubricant to the back of the brake pads. This helps to prevent squeaking caused by the pads vibrating against the caliper. Ensure not to get grease on the front of the pads where they contact the rotors, as this can severely affect braking performance.

Step 10. Reassemble the Brake Assembly and Wheels
Carefully reinstall the brake pads to their original position within the caliper assembly. Ensure everything is positioned correctly and securely before proceeding. Next, place the wheels back onto the wheel hubs and hand-tighten the lug nuts. Raise the vehicle slightly to remove the jack stands and then lower it fully to the ground using the jack.
Once the vehicle is down, use the lug wrench to tighten the lug nuts in a star pattern for an even distribution of pressure. The lug nuts must be tightened to the specifications listed in your vehicle’s owner manual to ensure they are adequately secured. Now, you can disengage the parking brake. Give your vehicle a test drive to ensure your brakes function smoothly and quietly.
By following these 10 easy steps, you can effectively clean your brake pads and maintain their longevity.
5 Additional Tips and Tricks
- Check for Wear Before Cleaning: Before cleaning, inspect your brake pads for any signs of excessive wear or damage. If the pads are too worn down, they should be replaced rather than cleaned to maintain optimal braking performance and safety.
- Use Isopropyl Alcohol: For a thorough cleaning, apply isopropyl alcohol to a clean cloth or sponge. This substance effectively removes dirt, grease, and brake dust without leaving any residue that could impact braking efficiency.
- Avoid Touching Pads With Bare Hands: Avoid handling the brake pads with bare hands after cleaning. Oils from your skin can transfer to the places and impede their effectiveness. If you need to touch them, wear clean gloves.
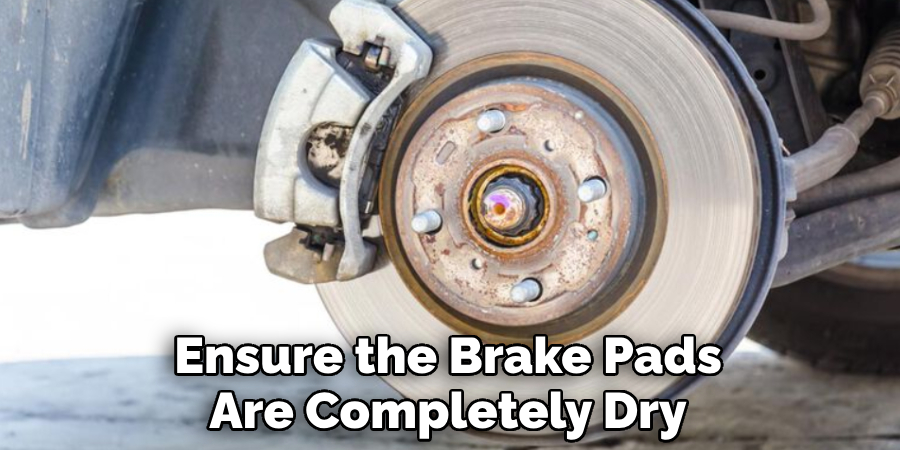
- Dry Thoroughly: Ensure the brake pads are completely dry before reinstalling them into the brake caliper. Any moisture can lead to reduced function and cause squeaking noises when braking.
- Bed In Your Pads: Once the brake pads are cleaned (or new places installed), perform a ‘bedding in’ process. This involves several stops from a moderate speed to evenly distribute the brake pad material onto the disc, which helps achieve the best braking performance.
With these additional tips and tricks, you can improve the effectiveness and longevity of your brake pads.
6 Things You Should Avoid
- Don’t Use Petroleum-Based Cleaners: Avoid any cleaners that contain petroleum-based solvents, as they can degrade the composition of the brake pads and reduce their stopping power.
- Avoid High-Pressure Washing: High-pressure water can force grit and debris into the sensitive areas of the brake system. Use a gentle stream of water if necessary during cleaning.
- Never Ignore the Condition of the Rotor/Disc: When focusing on the brake pads, don’t overlook the brake rotor/disc condition. Cleaning the pads without addressing a dirty or damaged rotor will not give optimal braking performance.
- Steer Clear of Abrasive Materials: Using abrasive materials or metal tools to scrape off debris can damage the brake pad’s surface, leading to uneven wear and poor braking efficiency.
- Don’t Apply Lubricants or Corrosion Inhibitors: While lubricants can prevent rust on certain bike parts, they should never be applied to brake pads as they can severely diminish braking capability.
- Do Not Reuse Old Brake Pads: Once brake pads are overused, they should be replaced with new ones. No amount of cleaning can restore their effectiveness, and using them could pose a safety hazard to you and others on the road.
By avoiding these common mistakes, you can ensure that your brake pads stay in top condition and provide reliable stopping power when needed.
Some Frequently Asked Questions
1. Can Water Damage Brake Pads?
Water can potentially damage brake pads if it is left on the surface for an extended period. Moisture can cause the places to deteriorate and lose their ability to grip the rotor, effectively reducing braking performance. In addition, water can also lead to rusting of metal parts within the brake system, which can compromise its functionality.
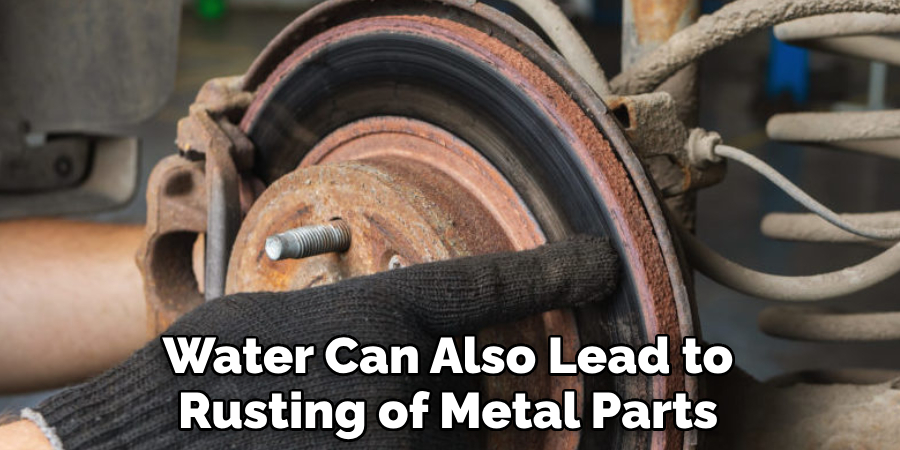
Therefore, it is essential to dry the brake pads thoroughly after cleaning or riding in wet conditions. It is also recommended to avoid using high-pressure water when washing your bike, as this can force water into sensitive areas of the brakes and cause damage. Regular maintenance and proper care can help prevent water damage to your brake pads and ensure optimal performance.
So, taking all necessary precautions while cleaning and maintaining your bike’s brake system is essential.
2. Does Oil Ruin Brake Pads?
Yes, oil can ruin brake pads. Oil can cause the brake pads to become slippery and lose their ability to grip the rotor, resulting in reduced braking performance. In addition, oil can also damage the composition of the pads and make them less effective at stopping your bike. It is important to avoid getting any oil on your brake pads, whether from lubricants, spills, or residue from other parts of your bike.
If you do accidentally get oil on your brake pads, it is essential to thoroughly clean them with a suitable cleaner and ensure they are scorched before using the brakes again. Neglecting to do so can result in compromised braking ability and potential safety hazards while riding.
Overall, avoiding any contact between oil and your brake pads is best to maintain their effectiveness and keep you safe on the road. So, always take precautionary measures while handling and maintaining your bike’s brake system.
3. What Destroys Brake Pads?
Brake pads endure substantial wear and tear as they are a critical component of a vehicle’s braking system. Several factors can accelerate the destruction of brake pads:
- Excessive Heat Generation: Continual, heavy braking can generate extreme heat, leading to brake fade, where the pads lose their friction properties.
- Poor Quality Material: Brake pads made from inferior materials may wear down quickly and not withstand the demands of consistent braking.
- Contamination: Exposure to chemicals like oil, hydraulic fluid, or even salt can significantly degrade brake pad material.
- Mismatch with Brake Rotors: Using brake pads that aren’t compatible with the rotors can lead to premature wear and tear on both components.
- Driving Habits: Aggressive driving that involves hard stops and rapid acceleration can cause the brake pads to wear down faster than usual.
- Environmental Factors: Operating a vehicle in extreme weather conditions or rough terrain can contribute to the earlier demise of brake pads.

Understanding these destructive factors can help in proactive vehicle maintenance and extend the life of the brake pads.
4. Why Do Front Brakes Wear Faster?
Front brakes often bear the brunt of the workload during braking because weight and momentum shift to the front as the vehicle slows down. This dynamic increases the pressure and heat on the front brakes, causing them to wear down faster than the rear. Moreover, most vehicles are designed with front brake systems that are more robust due to this weight transfer effect, further contributing to the front brakes’ accelerated wear rate. Understanding this can be crucial for drivers to monitor their front brakes more frequently and ensure timely maintenance for optimal safety and performance.
Additionally, different driving habits, like frequent city driving or heavy loads, can also impact the wear rate of front brakes. Therefore, it is essential to regularly check and replace worn front brake pads to maintain safe and effective braking performance. So, pay attention to your vehicle’s braking dynamics and keep a close eye on your front brake system for optimum safety on the road.
5. How Do You Check Brake Pads?
There are several ways to check the condition of your brake pads. Here are some easy steps you can follow:
- Visual Inspection: The most basic way to check brake pads is to closely examine them. You can do this by looking through the spokes of your wheel or removing the tire if necessary. Look for signs of wear and tear, such as thinning or unevenness.
- Measure Pad Thickness: Use a ruler or calipers to measure the thickness of your brake pads. It is time to replace them if they are less than 1/4 inch thick.
- Listen for Squealing Sounds: Worn brake pads often make squealing or screeching noises when braking. If you hear these sounds, it is a sign that your brake pads need to be replaced.
- Check for Vibrations or Poor Braking Performance: If your vehicle vibrates when braking or takes longer to stop, it could be due to worn brake pads.
- Get Professional Inspection: If you need clarification about the condition of your brake pads, it is always best to get them inspected by a professional mechanic. They can provide a more accurate assessment and recommend maintenance or replacements.
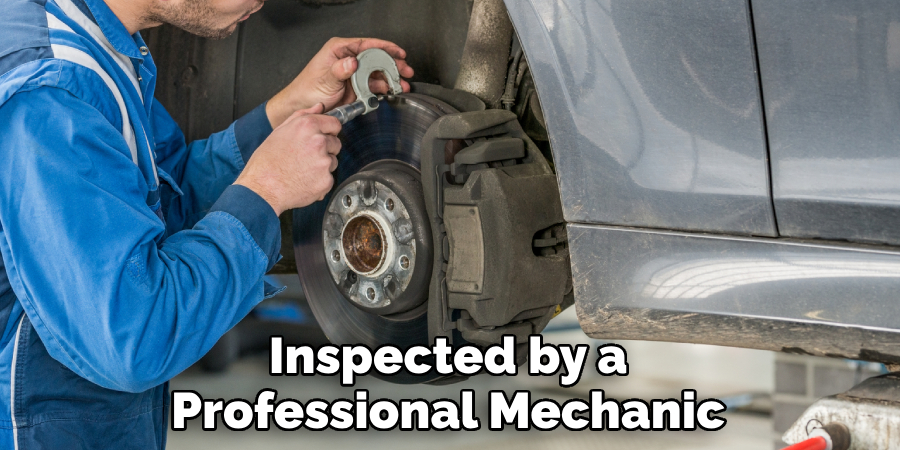
Regularly checking your brake pads is essential to vehicle maintenance and can help prevent potential safety hazards on the road. So, keep an eye on your brake pads and replace them as needed for optimal performance.
Conclusion
In conclusion, the proper maintenance and cleaning of brake pads are vital for ensuring the safety and functionality of your braking system. By following the aforementioned tips and avoiding the listed pitfalls, you can extend the life of your brake pads and enhance your overall braking performance.
Always remember to inspect your brake pads regularly and clean them with suitable materials, taking care to preserve both the places and the surrounding brake components. A well-maintained brake system is key to a safe and enjoyable riding experience.
Hopefully, the article on how to clean brake pads has provided you with the necessary knowledge and techniques to clean your brake pads effectively. Happy riding!

About
JeepFixes Team is a skilled author for Jeep Fixes, bringing 6 years of expertise in crafting a wide range of jeep fixes. With a strong background in jeep fixes work, JeepFixes Team’s knowledge spans various types of fixtures, from decorative pieces to functional hardware, blending precision with creativity. His passion for jeep fixes and design has made him a trusted resource in the industry.
Professional Focus:
Expert in Jeep Fixes : JeepFixes Team aesthetic specializes in creating durable and innovative jeep fixes, offering both appeal and functionality. His work reflects a deep understanding of jeep fixes techniques and materials.
Sustainability Advocate : He is dedicated to using sustainable practices, ensuring that every fixture is crafted with eco-friendly methods while maintaining high-quality standards.
In his writing for jeep fixes, JeepFixes Team provides valuable insights into the latest trends, techniques, and practical advice for those passionate about jeep fixes, whether they are professionals or DIY enthusiasts. His focus on combining artistry with engineering helps others discover the true potential of jeep in design.