

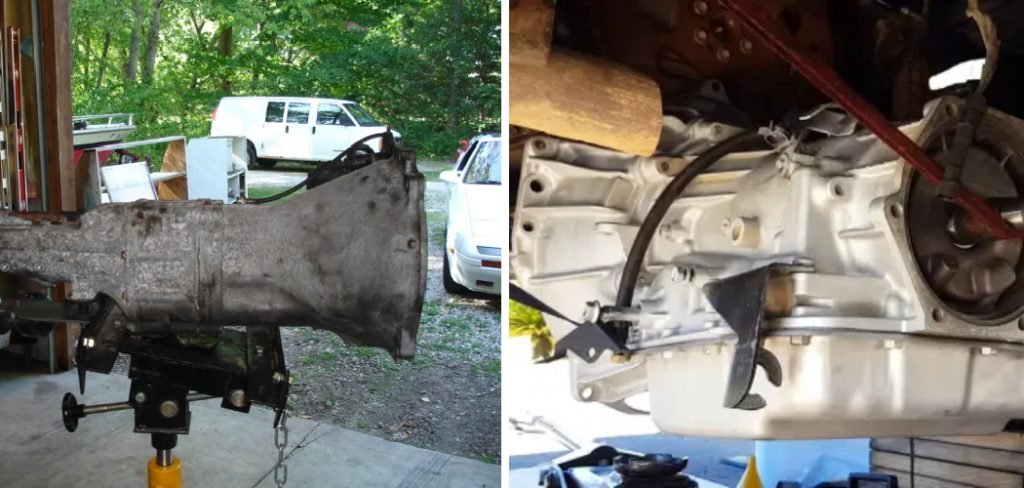
Removing a transmission is a critical task typically undertaken for repairs, replacement, or to gain access to other vehicle components. The challenge of how to drop a transmission without a lift involves extensive mechanical prowess and careful planning to safely bypass the convenience of professional equipment. The absence of a hydraulic lift means relying on manual methods to access and remove the hefty component that plays a crucial role in a vehicle’s drivetrain.
Emanating from this process is a heightened risk factor that necessitates an uncompromising commitment to safety and meticulous preparation. Understanding the gravity of the task at hand, ensuring the presence of appropriate safety gear, and comprehensively strategizing each step are the pillars of successfully and safely conducting this complex procedure sans a lift.
Safety First
Safety should never be an afterthought when undertaking any vehicle maintenance task, especially when attempting to drop a transmission without a lift. The inherent risks of working under a vehicle can be substantial, given the weight and complexity of the parts involved. Without the security of a professional lift, one must compensate with precision by using jack stands, ramps, and wheel chocks, which will bear the vehicle’s considerable load.
Before commencing, one must suit up with appropriate safety equipment — this means donning safety glasses to protect your eyes from debris, sturdy gloves to safeguard hands while working with heavy components and fluids, and wearing work clothes that offer both comfort and protection. Moreover, a fire extinguisher is crucial, as working with a vehicle’s electrical and fuel systems can pose a fire hazard.
Proper jacking techniques are paramount: Position the floor jack under the recommended lift points of the vehicle, ensuring that the ground is stable and level. Raising the vehicle incrementally and then securing it with jack stands rated for the vehicle’s weight is a crucial step — never rely on the jack alone to support it.
Jack stands should be placed at the designated support areas to prevent structural damage and ensure the vehicle remains stable while elevated. See that the wheel chocks are firmly placed against the wheels on the opposite end of the vehicle being lifted to prevent any rolling.
After setting the vehicle on jack stands, always double-check its position and stability by giving the car a gentle shake before fully getting underneath it. This ensures everything is securely in place and provides added reassurance of safety while performing the task at hand. Safety is not just a practice but a prerequisite when performing complex mechanical work without the advantages of a professional workshop environment.
Tools and Materials
Equipping yourself with the right tools and materials is pivotal before dropping a transmission without a lift.
The fundamental toolkit should include a set of wrenches and sockets of various sizes, compatible with your vehicle’s fasteners. Typically, sockets ranging from 8mm to 19mm are necessary for most passenger vehicles, with larger trucks requiring up to 22mm or more.
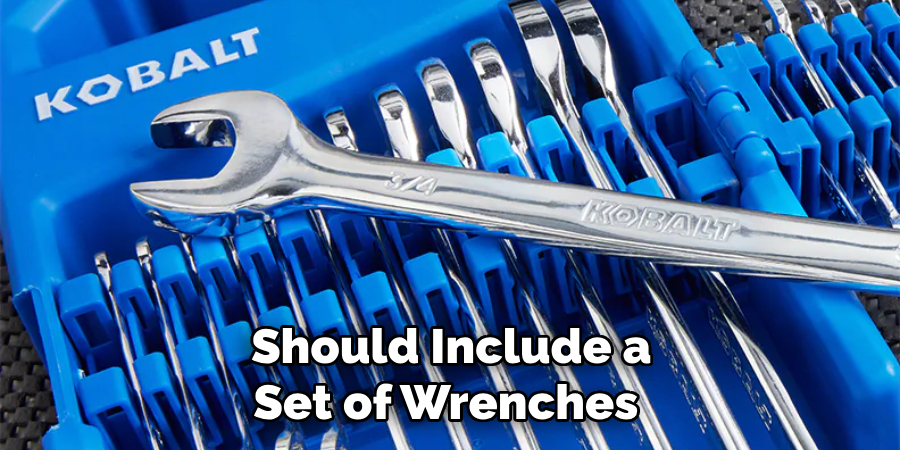
A reliable ratchet and extension bars provide the leverage needed to break loose, tight bolts. At the same time, a torque wrench is essential for reassembly, ensuring all fasteners are tightened to the manufacturer’s specifications.
For supporting the transmission, consider using a high-capacity transmission jack adapter, which can be attached to a regular floor jack, or, in its absence, alternatives such as heavy-duty safety straps or wooden support.
A large drain pan is requisite for containing transmission fluid, and it is always advised to have new transmission fluid ready for refill post-reinstallation. If you are working on a specific type of vehicle, reference the owner’s manual for the recommended fluid type and capacity.
Additionally, have some clean rags and a sealable container for disposing of used fluids environmentally. With all necessary tools and materials prepared and accounted for, your workspace will be optimized for a smooth and organized operation.
Vehicle Preparation
Preparing the vehicle is crucial in dropping a transmission without a lift. Begin by parking the vehicle on a level, solid surface to ensure it remains stable throughout the procedure. Once positioned, engage the parking brake to prevent any inadvertent movement. This step cannot be overstated; not only does it aid in your safety, but it also helps to protect the integrity of the vehicle during the disassembly process.
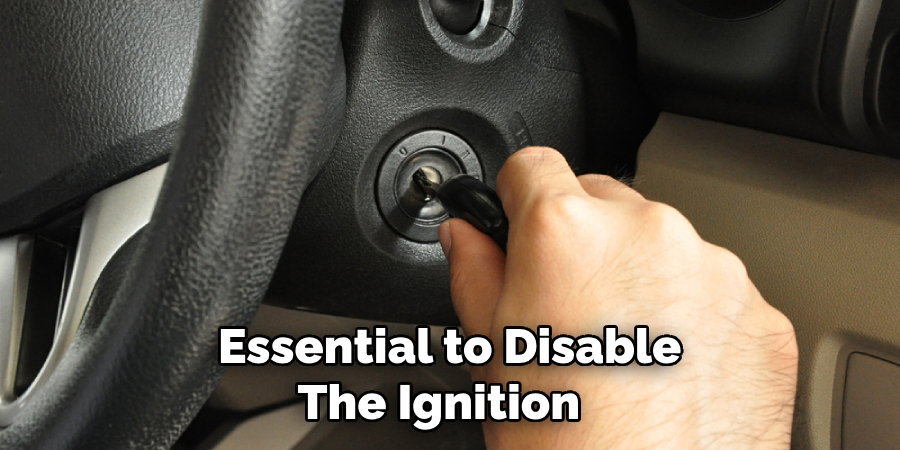
Next, it’s essential to disable the ignition and electrical system to prevent any accidental starts or electrical shocks. Disconnect the negative battery cable to cut the power; this is typically found on the negative (-) post of the battery and secured by a bolt or nut. Use an appropriate wrench to loosen this, and then carefully remove the cable, ensuring it does not come into contact with any metal parts of the car.
With the electrical system disabled, attention can be turned to draining the transmission fluid. Place a large drain pan under the transmission’s drain plug, which is found on the lower transmission pan for most vehicles. While wearing gloves, remove the drain plug using the correct size socket or wrench.
Allow the fluid to completely drain into the pan. If your vehicle’s transmission does not have a drain plug, you may need to remove the transmission pan to drain the fluid, which involves unscrewing several bolts. Always consult your vehicle’s service manual for the specific location of the drain plug and detailed instructions related to your vehicle model.
Some vehicles may require the removal of exhaust components to gain enough clearance for transmission removal. This typically involves unfastening the exhaust pipe flange and support brackets. A penetrating lubricant is invaluable for loosening rusted or tight bolts. Support the exhaust with a stand or hanger once disconnected to avoid stressing other components.
Lastly, disconnecting the shifter linkage is necessary to free the transmission from the vehicle. Locate the linkage attached to the transmission, which could be held by retaining clips, bolts, or nuts. Remove these fasteners carefully and detach the linkage. Be sure to keep all fasteners and removed parts organized and labeled for reassembly.
By following these detailed steps for vehicle preparation, you succeed in creating a secure and ready workspace for the subsequent phase of lowering the transmission, ensuring you do so with the utmost precision and safety.
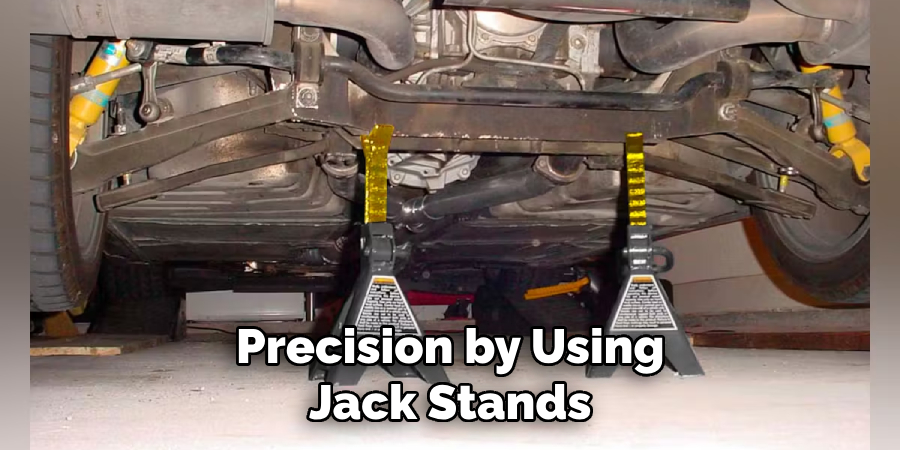
Supporting the Vehicle
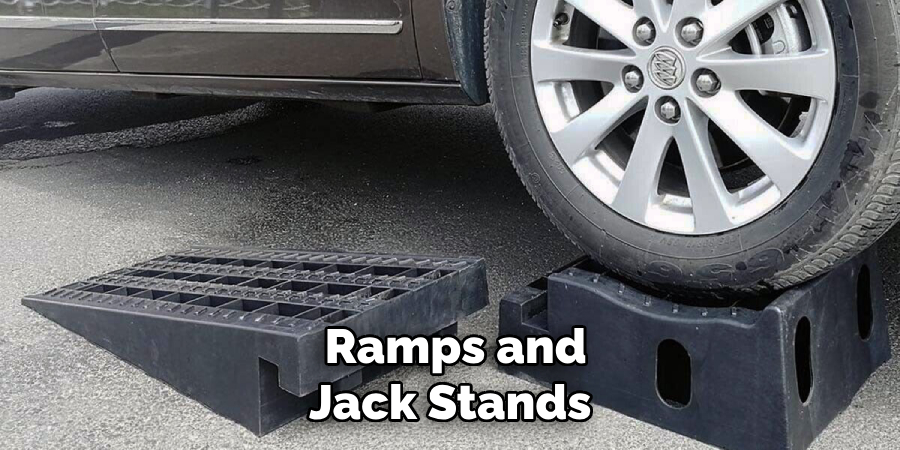
When working beneath a vehicle, ensuring it remains securely elevated is vital. Two common tools for this purpose are ramps and jack stands, each having distinct advantages and suitability for particular tasks. Ramps are solid, inclined planes that a vehicle can be driven onto, raising it to a fixed height.
They’re excellent for quick oil changes or tasks requiring limited access to the vehicle’s underside. However, ramps are not suitable for tasks like dropping a transmission, as they offer no way to sufficiently disengage the wheels or lower the transmission.
Jack stands, on the other hand, are adjustable metal supports with a broad base and a flat top with a recess to accept the vehicle’s specific lift points. Jack stands superior for our task as they provides the clearance and stability needed to work safely under a car, particularly when removing heavy components.
To properly use jack stands, start by choosing ones with a load capacity that meets or exceeds the weight of your vehicle—often denoted by the tonnage on the stand. A pair of 3-ton jack stands is typically sufficient for a standard passenger car.
To securely position the stands:
- Lift the vehicle incrementally with a floor jack at its factory-recommended lift points.
- Once at the desired height, carefully slide the jack stands into place, positioning them under the vehicle’s designated support areas.
- Lower the vehicle slowly onto the stands, ensuring the vehicle’s weight is evenly distributed on the saddle of the stands.
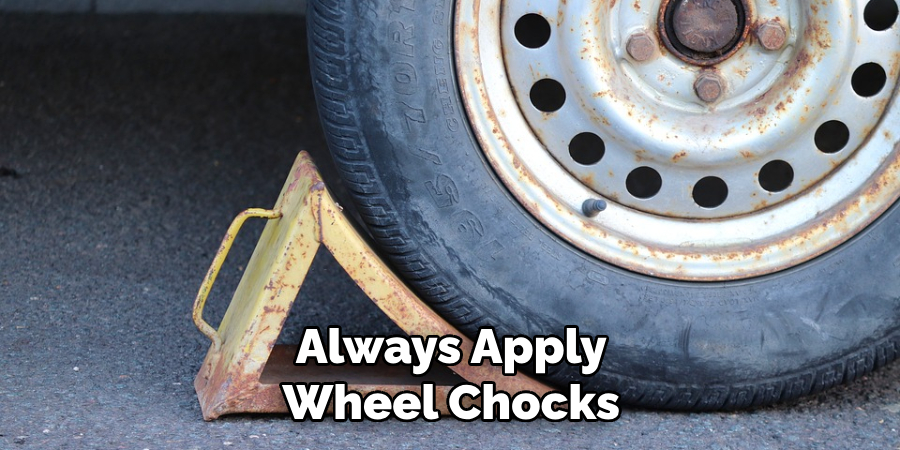
Always apply wheel chocks to the wheels resting on the ground for additional safety, creating a more stable base. Before getting underneath, make a final check by giving the vehicle a gentle but firm shake to test the stability of the setup. Double-check that the jack stands have not settled or shifted and that all parts are securely in place. Only when you are confident in the vehicle’s stability should you proceed. Safety is paramount; no job is too urgent to compromise your well-being.
Disconnecting Components
Once the vehicle is securely supported and stabilized, you will disconnect various components linked to the transmission. This systematic approach minimizes the risk of overlooking essential connections during reassembly:
- Labeling: Before disconnection, it is crucial to label all wiring, hoses, and links connected to the transmission. Use colored tags or masking tape and a marker to make clear notations.
- Ground Straps: These are critical for the vehicle’s electrical integrity. Locate and disconnect ground straps, usually attached to the engine block or vehicle frame.
- Electrical Connectors: Methodically disconnect all electrical connectors to the transmission, including those to sensors and solenoids. Handle with care to ensure no damage to the plugs or wiring.
- Cooling Lines: Transmission fluid cooling lines should be disconnected next. Have a drain pan ready, as fluid will likely spill when these lines are removed.
- Driveline: Detach the driveshaft or axles, depending on whether your vehicle is rear-wheel drive (RWD), front-wheel drive (FWD), or all-wheel drive (AWD). For RWD, remove the fasteners on the driveshaft coupling and safely support the driveshaft. For FWD and AWD, axles will need to be unbolted from the transmission and removed.
- Linkages and Cables: Any linkages, such as gear selectors or cables, should be detached and labeled.
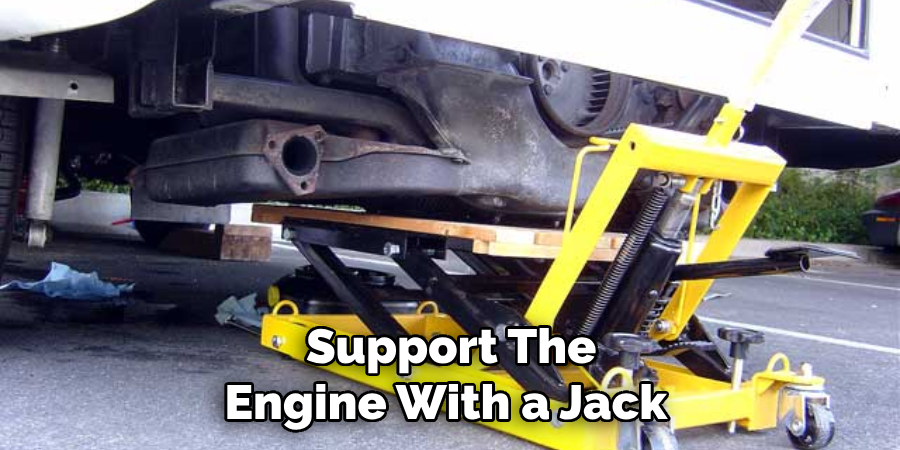
- Crossmember and Motor Mounts: If they impede transmission removal, unbolt the crossmember and carefully support the engine with a jack and a block of wood to avoid any damage to the oil pan.
Always prioritize safety and cautious handling of components. Placed removed parts in sections for their respective reassembly areas and used containers or bags to keep screws and bolts organized. Following a disciplined and methodical order ensures that every part is accounted for and reassembly will be as efficient as the disassembly.
Additional Considerations
Environmental conscience during vehicle maintenance is crucial. Used fluids like transmission fluids should be properly collected and disposed of at a recycling center, never dumped into drains or onto the ground. During part cleaning, use environmentally friendly degreasers and dispose of any waste responsibly.
Always anticipate potential complications — stripped bolts or unexpected leaks — and have a backup plan that might include consulting a professional mechanic. Preparing for the unexpected ensures that you can address issues without causing damage to your vehicle or the environment.
How to Drop a Transmission Without A Lift: A Beginner’s Guide
Removing a vehicle’s transmission is a complex process that requires careful planning, an understanding of your vehicle’s design, and a strong attention to safety. Begin by identifying the type of vehicle you’re working with: rear-wheel drive (RWD), front-wheel drive (FWD), or all-wheel drive (AWD), as each design has nuances influencing the removal process.
1. RWD Vehicles:
For RWD vehicles, the transmission is typically more accessible, and the removal starts with positioning a transmission jack beneath the gearbox. The jack should have a wide base, an adjustable transmission cradle, and straps to secure the transmission. Before lowering, remove all bolts attaching the transmission to the engine. Slowly lower the jack, carefully guiding the transmission to clear the engine and cross member. RWD vehicles typically have ample space, reducing the complexity involved in maneuvering the transmission out from under the car.
2. FWD and AWD Vehicles:
FWD and AWD vehicles present a greater challenge because the transmission is tucked into the engine bay more tightly. After securing the gearbox on a transmission jack, attention must be paid to the way the transmission is angled out from its position. It often requires tilting to clear surrounding components and subframes. Additional care must be taken for AWD vehicles to avoid damage to the more complex drivetrain components.
3. Supporting the Transmission:
Ensure the jack cradle aligns with the transmission pan to avoid damage when supporting the transmission. If a transmission jack is unavailable, alternatives like a sturdy floor jack with a broad wooden block can be used, although this is less ideal. Whichever method, always strap the transmission to the support to prevent slips or shifts in weight.

4. Maneuvering the Transmission Out:
The key to safely maneuvering the transmission out is to go slow and maintain control. For all vehicles, once the transmission is free from the engine, it should be gently lowered and continuously checked for any snagging wires or hoses. A second person can help guide the transmission and watch for any obstacles.
5. Addressing Potential Challenges:
Potential challenges include limited workspace, seized bolts, or heavy transmissions that are difficult to balance. For cars with tight engine bays, removing additional components for clearance may be necessary. Use penetrant sprays for seized bolts and have a range of tools at hand to deal with rusted or rounded heads. Consider using a transmission jack with a tilting mechanism for better balance and control for heavy transmissions.
6. Safety First:
Always ensure the vehicle is securely supported on jack stands, and never rush the process. Wear appropriate safety gear, including gloves and eye protection. Remember that transmissions are bulky and weighty components; never attempt to support or guide them without proper equipment or assistance.

In conclusion, removing a transmission can vary significantly in difficulty, largely influenced by the type of vehicle. By following these steps and focusing on safety, you can maneuver the transmission out with control and confidence. Be prepared for challenges, and when in doubt, consult with a professional mechanic to prevent damage to the vehicle, the transmission, or yourself.
Inspecting and Cleaning
Once the transmission is removed, conducting a thorough inspection is vital for identifying any damage or wear that could impact the vehicle’s performance. Look for signs such as cracks, corrosion, or unusual wear patterns. Inspect gears, clutches, and seals for integrity. This proactive measure can save time and expense by catching issues before reassembly.
To clean the transmission exterior and related components, first remove any debris or dirt that could contaminate the transmission internals during reassembly. Use a gentle stream of degreaser and a soft brush to scrub away grime without harming the metal surfaces. Compressed air can blow out dust from crevices, while microfiber towels help dry and polish the transmission.

Fluid leaks, if present, can indicate problematic seals or gaskets and should be addressed before the transmission is reinstalled. Clean off old fluid, pinpoint the leak’s source, and replace the faulty components. It’s also a good time to replace the transmission filter and pan gasket—doing so prevents future leaks and ensures optimal fluid flow.
Through rigorous inspection and meticulous cleaning, you can ensure a smooth reassembly process, extend the transmission’s lifespan, and maintain the vehicle’s reliability.
That’s it! You’ve now learned how to drop a transmission without a lift, as well as how to properly inspect and clean the transmission before reassembly. By following these steps and taking a proactive approach to maintenance, you can confidently tackle this complex task and keep your vehicle running smoothly for years to come. Remember, safety is always the top priority, so never hesitate to consult a professional mechanic if needed.
Clutch or Torque Converter Replacement (Optional)
Upon removing the transmission, you may choose to replace the clutch on manual vehicles or the torque converter on automatics. This is an ideal opportunity to upgrade these vital components, ensure optimal performance, and prevent future issues.
Manual Transmission: Clutch Replacement:
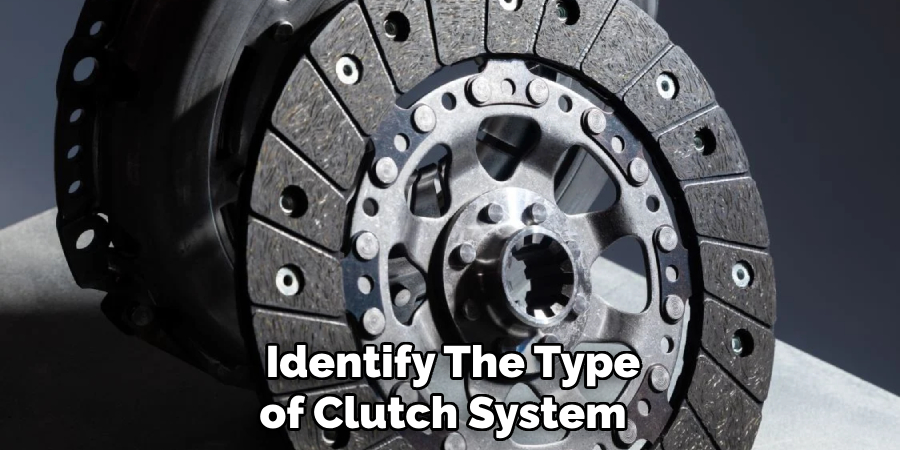
When replacing the clutch, first, identify the type of clutch system your vehicle uses—a single, twin, or triple-disc clutch—for the appropriate replacement kit. Before installation, inspect the flywheel; it may need to be resurfaced or replaced to ensure a flat mating surface.
- Begin by removing the old clutch disc, pressure plate, and throw-out bearing.
- Clean the flywheel and pilot bearing. Replace the pilot bearing if there are signs of wear or damage.
- Position the new clutch disc and pressure plate onto the flywheel using an alignment tool, which is crucial to align the splines and pilot bearing.
- Torque the pressure plate bolts in a star pattern to the manufacturer’s specifications to avoid warping.
Automatic Transmission: Torque Converter Replacement:
Inspect the torque converter for any signs of wear or damage for vehicles with an automatic transmission. Replacing a faulty torque converter involves:
- Draining the old fluid from the converter if it’s not already empty. Remember, old fluid can carry contaminants that may harm the transmission.
- Line up the input shaft splines and carefully install the new converter, ensuring it seats properly. This often requires a rotation and gentle push to slide into place. If improperly aligned, there is a risk of damage during the reinstallation of the transmission.
- Once seated, apply a thin layer of transmission fluid to the converter neck and drive plate to ensure smooth operation.
Safety and Accuracy:

Replacement of either the clutch or the torque converter requires meticulous attention to detail and the use of correct tools. Improper installation can lead to transmission failure and potentially hazardous driving conditions. Always adhere to safety precautions, use a torque wrench for accurate tightening, and consult manufacturer specifications for guidance. Investing in high-quality replacement parts can spare future costs and maintain vehicle integrity.
It’s imperative to replace these components with precision and care. Should you be uncertain or lack the proper tools for the task, seeking professional assistance is advised to safeguard against the risk of costly repairs or unsafe driving conditions.
Preparing for Reassembly
Prior to the reinstallation of the transmission, it’s pivotal to ensure the engine bell housing and adjacent areas are free of contaminants that could impair operations or cause premature wear. A meticulous cleaning should be executed, ridding the space of any residual oil, dirt, or debris. This can be accomplished using a degreaser and a soft brush for delicate surfaces, followed by wiping it down with a clean cloth.
Attention should then shift to checking the flywheel on manual vehicles or the torque converter on automatics for compatibility with the new or refurbished transmission and any signs of excessive wear. Any discrepancies in fit or signs of damage could result in operational failures and should be rectified before proceeding.
In the case of installing a new transmission, there might be manufacturer-specific guidelines to follow that pertain to installation angles, bolt torque specifications, and pre-lubrication of certain components. These essential pieces of information are typically found in the service manual or installation instructions provided with the new transmission. Ignoring these details can lead to an improper fit or function and potentially severe damage to the transmission or vehicle.
Reinstalling the Transmission

Reinstalling the transmission into your vehicle requires precision, patience, and adherence to the correct procedures. Begin by positioning the transmission close to the engine bell housing, using a transmission jack to support its weight. Carefully guide the transmission shaft into the bell housing, ensuring that the input shaft aligns with the pilot bearing (for manual) or that the torque converter is properly seated with the flexplate (for automatic transmissions).
- Gently slide the transmission towards the engine, ensuring there is no undue force or misalignment. Remember not to force the transmission into place, as this can damage both the transmission and the engine components.
- Once the transmission is in place, start threading the bell housing bolts by hand to secure the transmission to the engine. Do not tighten any bolts completely until all bolts have been started to ensure proper alignment of all mounting points.
- Using a torque wrench, progressively tighten the bell housing bolts to the manufacturer’s specifications. Following the tightening sequence provided in the vehicle’s service manual—usually in a crisscross or star pattern—is critical to avoid warping the housing or causing leaks.
- Reconnect the transmission to all other components, such as the starter motor, gear selector mechanism, speed sensors, and wiring harnesses. Ensure that each connector is secure and that the wiring is routed away from any hot or moving parts.
- Reattach the exhaust system, transmission mounts, cross-members, and driveline components. This includes driveshafts or axles, and don’t forget to insert any retaining clips or bolts that hold these components in place.
- Fill the transmission with the appropriate type and amount of fluid. For automatics, this includes the fluid for the torque converter, which often requires adding fluid through the transmission dipstick tube until it reaches the proper level.
- Before fully lowering the vehicle, connect the battery and start the engine to check for any leaks. With the vehicle still elevated, shift through all gears with your foot on the brake to ensure that the transmission engages smoothly and correctly.
- Lastly, carefully lower the vehicle back down and perform a final inspection for leaks and proper operation. Remember to recheck the transmission fluid level after the vehicle has been run and reached operating temperature.
The importance of following torque specifications and tightening sequences cannot be overstated; these steps are crucial for preventing leaks, ensuring structural integrity, and guaranteeing the optimal performance of your newly installed transmission. Any deviation from these standards increases the risk of transmission or vehicle damage and should be avoided. If, at any point, the installation process feels outside of one’s skill level or scope of knowledge, professional assistance should be sought.
Final Touches and Testing
The last steps to ensure your transmission runs smoothly include careful refilling of the transmission fluid and reconnection of the vehicle’s electrical and mechanical components. To refill the transmission fluid, locate the dipstick tube for automatics, or the filler plug for manuals.
Using a funnel, pour the recommended type of fluid slowly, to avoid air bubbles. For automatics, pour the fluid incrementally, checking the level with the dipstick until you reach the correct level. Manuals typically require filling until the fluid is level with the bottom of the filler plug hole.
The reconnection of the electrical system requires attentiveness to prevent faults. Reconnect all the wiring harnesses to their corresponding sensors and solenoids on the transmission. The shifter linkage or cable needs proper attachment for accurate gear selection. Make sure all grounding straps are in place, as these are vital for the electrical integrity of the vehicle.
After the reassembly, start the vehicle and let it idle for a few minutes. Keep an eye out for any leaks underneath the car, specifically around the transmission. Inspect for abnormal noises that might suggest loose parts or mechanical interference. Check the shifter operation to confirm that the transmission cycles through all gears without hesitation or abnormal noise.
Before road-testing, verify the transmission fluid level is correct, now with the engine running. Road testing of the vehicle is imperative to evaluate the full range of operating conditions. Ensure there’s smooth shifting through all gears, pay attention to the vehicle’s responsiveness, and monitor for any irregular sounds.
After the test drive, inspect once more for leaks and review the fluid level, adjusting if necessary. Remember, the true measure of a successful transmission service is a seamless driving experience post-installation. Regular monitoring of the transmission’s performance post-repair can prevent future issues and extend the longevity of your vehicle’s transmission.
Conclusion
Dropping and reinstalling a transmission without a lift is intricate and requires a systematic approach.
Key steps involve supporting the vehicle securely on jack stands, disconnecting and removing essential components, and carefully lowering the transmission using a transmission jack or equivalent. Thorough preparation ensures a safe work environment and paves the way for a successful installation. It’s vital to follow specific instructions, such as torque specifications and proper alignment, which are fundamental to maintaining vehicle performance and safety.
The keyword “how to drop a transmission without a lift” underscores the gravity of the task at hand and emphasizes the importance of executing each step with precision. For further information or assistance, consult the vehicle’s service manual or trusted automotive repair guides or seek a professional mechanic. Remember, safety is paramount, and proper tools and procedures are non-negotiable in DIY automotive tasks.
Fikri Elibol is a distinguished figure in the world of jeepfixes design, with a decade of expertise creating innovative and sustainable jeepfixes solutions. His professional focus lies in merging traditional craftsmanship with modern manufacturing techniques, fostering designs that are both practical and environmentally conscious. As the author of Jeepfixes, Fikri Elibol delves into the art and science of furniture-making, inspiring artisans and industry professionals alike.
Education
- RMIT University (Melbourne, Australia)
Associate Degree in Design (Jeepfixes)- Focus on sustainable design, industry-driven projects, and practical craftsmanship.
- Gained hands-on experience with traditional and digital manufacturing tools, such as CAD and CNC software.
- Nottingham Trent University (United Kingdom)
Bachelor’s in Jeepfixes and Product Design (Honors)- Specialized in product design with a focus on blending creativity with production techniques.
- Participated in industry projects, working with companies like John Lewis and Vitsoe to gain real-world insights.
Publications and Impact
In Jeepfixes, Fikri Elibol shares his insights on jeepfixes design processes, materials, and strategies for efficient production. His writing bridges the gap between artisan knowledge and modern industry needs, making it a must-read for both budding designers and seasoned professionals.