

Repairing a damaged fender is a common automotive task that can save both money and time compared to a full replacement. Whether your vehicle’s fender has suffered a minor dent, a scratch, or more significant damage, knowing how to fix a fender can be a valuable skill. In this comprehensive guide, we will explore various methods and techniques to address different types of fender damage.
From using simple tools for minor dents to employing more advanced approaches for significant repairs, understanding the step-by-step process of fixing a fender ensures that your vehicle not only regains its aesthetic appeal but also maintains its structural integrity. Whether you’re a seasoned DIY enthusiast or a novice looking to tackle a fender repair for the first time, this guide will provide valuable insights into restoring your vehicle’s exterior with confidence and precision.
Importance of Fixing Fenders
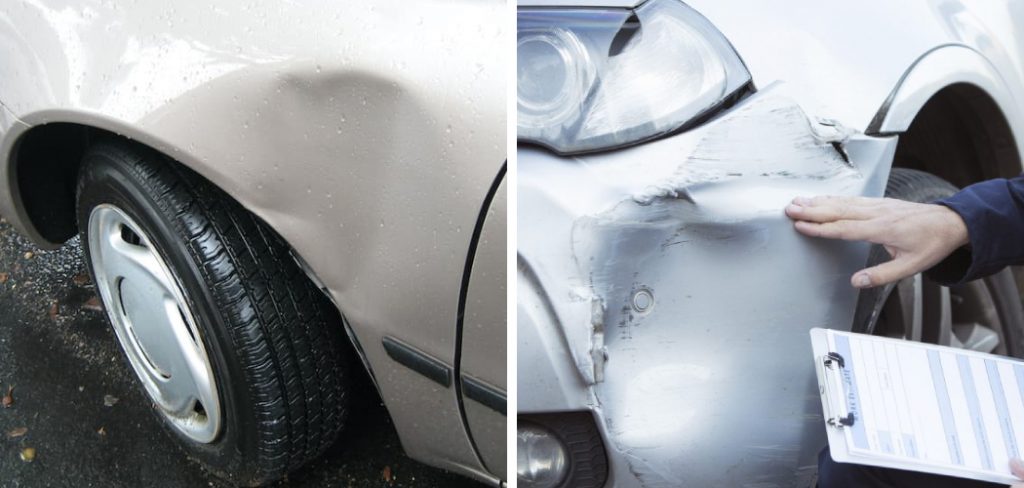
Repairing a fender is more than just a cosmetic fix; it is crucial for several reasons. A damaged fender can lead to rust and corrosion, which weaken the structure of the vehicle and reduce its lifespan. Additionally, fenders play a significant role in protecting the vehicle’s wheels and the body from road debris and collisions. Neglecting fender damage can also lead to more costly repairs down the line and can negatively impact the resale value of the car. Prompt and proper fender repair is key to maintaining the vehicle’s appearance, safety, and overall value.
Common Causes of Fender Damage
Fender damage can occur due to a variety of factors, some of the most common being low-speed collisions and mishaps in parking lots where space is limited. Additionally, adverse weather conditions, such as hail or debris propelled by strong winds, can cause dents and scratches. Another frequent cause is impact with stationary objects, like curbs or lamp posts, especially when maneuvering in tight spaces.
Notably, car doors opened carelessly by occupants in adjacent parking spots can also lead to chips and dents. Understanding these common causes of fender damage is the first step in prevention and determining the right approach for repair.
Assessing Fender Damage
Before embarking on a repair, it’s essential to assess the extent of damage to your fender. A thorough examination will help you determine whether you can handle the repair yourself or need professional assistance. Begin by cleaning the area to get a clear view of the damage. Look for any signs of paint chipping, scratches, dents, or rust. If the damage is merely superficial, such as a small dent or minor scratch, DIY methods can be effective.

However, if there is significant crumpling or rust that compromises the fender’s structure, professional repair might be necessary. Additionally, consider the materials your fender is made of—steel, aluminum, or plastic—as this will influence the repair techniques used. Always remember that accurate damage assessment is the foundation of any successful repair job.
Identifying Types of Damage
To effectively repair a fender, it is important to categorize the type of damage it has sustained. Generally, fender damage can be classified into three categories: dents, scratches, and structural damage.
- Dents are often the result of impacts and may vary in size from small door dings to large indentations. They do not always affect the paint, which may mean a simpler repair process.
- Scratches can range from superficial marks on the surface of the paint to deep gouges that penetrate to the metal. The depth and extent of the scratch will determine the needed repair techniques.
- Structural Damage involves more serious compromise to the fender’s integrity, including bends or cracks that affect how the fender aligns with the vehicle’s body.
Identifying the type of damage is crucial, as it dictates the repair process and the materials necessary for the job. It is also essential for evaluating the potential costs and time investment required to restore the fender to its original condition.
Evaluating Severity of Damage
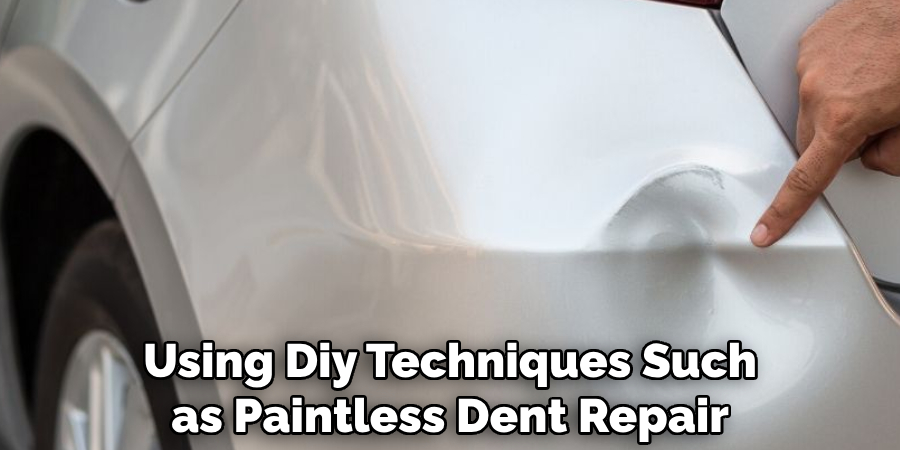
After determining the type of damage sustained by the fender, the next step is to evaluate its severity, which will guide the repair process. Minor dents and scratches, which are largely cosmetic, can often be resolved using DIY techniques such as paintless dent repair or touch-up painting. In contrast, severe damage that involves deep scratches or dents, especially those that result in sharp edges or have caused the fender to become misshapen, will likely require more advanced skills and possibly the assistance of a professional.
Severely compromised fenders, particularly those with tears or extensive corrosion, often necessitate replacement to ensure the vehicle’s safety and structural soundness. Accurately evaluating the severity of the damage not only influences the repair approach but also affects the cost and time required to bring the fender back to satisfactory condition.
Determining Repair Techniques
Depending on the type and severity of the fender damage, selecting the appropriate repair technique is critical for a successful fix. For minor dents without paint damage, paintless dent removal (PDR) is an efficient and cost-effective technique. This method involves using specialized tools to gently massage the dent from behind the fender, restoring its original shape without the need for painting.
For scratches, the technique varies based on depth. Light scratches may be buffed out or covered with touch-up paint, while deeper ones might require sanding, application of a body filler, and repainting to match the surrounding area.
Gathering Necessary Tools and Materials
Tools for Dent Removal
Once you have decided on the best technique for your fender’s dent removal, it is vital to assemble the appropriate tools and materials for the job. For executing Paintless Dent Removal (PDR), you will need:
- A PDR kit, which typically includes various shaped rods and tools designed to reach behind the vehicle’s bodywork and carefully massage the dent out.
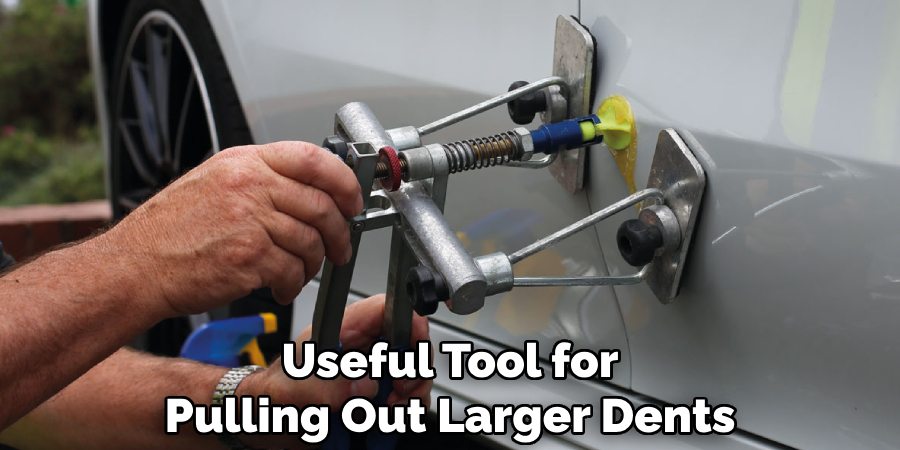
- A dent puller, which can be a useful tool for pulling out larger dents from the external side.
- A rubber hammer and a tap down tool to fix minor high spots and to fine-tune the repair.
- Lighting or a reflection board, which helps to make the dent more visible by casting a contrasting pattern over the damaged area.
If your repair involves dealing with scratches or a more traditional dent removal process, you may need:
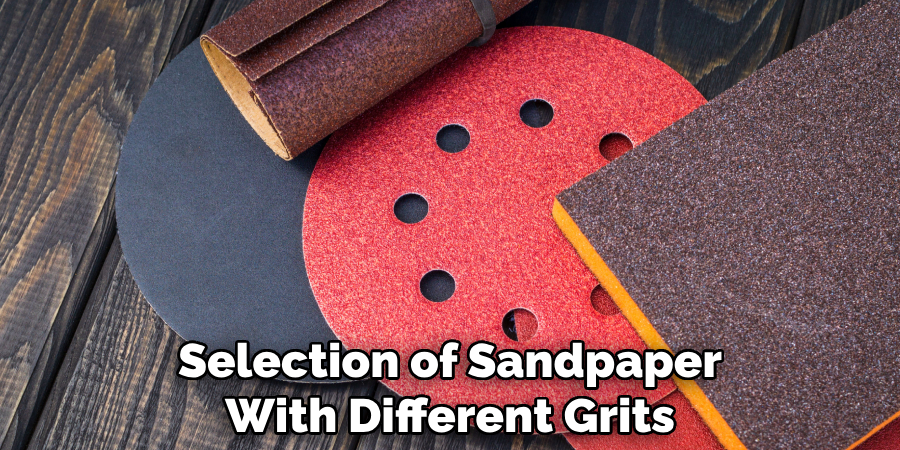
- Sandpaper in various grits for smoothing out the surface.
- Body filler to fill in larger gaps or indentations.
- Primer and matching paint to cover and protect the repaired area.
- Clear coat to seal and give a glossy finish to the paint job.
Always remember that while the right tools are essential, so is patience and carefulness in using them to achieve a professional-looking finish.
Materials for Filling and Sanding
When preparing to address scratches or to fill dents that require sanding and repainting, it is important to have the correct materials on hand to ensure a smooth and durable repair. The materials needed typically include:
- Body Filler: Also known as Bondo, it is used to fill dents and create a smooth, even surface on the fender.
- Hardener: This is mixed with the body filler before application to initiate the curing process.
- Sandpaper: A selection of sandpaper with different grits is necessary. You’ll need coarse grits (like 80 or 100) to shape the body filler and finer grits (such as 200 to 400) for finishing touches before painting.
- Sanding Block: This provides an even surface to wrap the sandpaper around and ensures consistent pressure during sanding.
- Putty Knife or Spreader: A flexible blade for applying and shaping body filler.
- Tack Cloth: To remove dust and debris after sanding, ensuring a clean, contaminant-free surface for painting.
Gathering these materials beforehand streamlines the repair process and helps prevent any interruptions or unexpected trips to the store. Being fully prepared allows you to focus on achieving a seamless and professional-looking repair job.
Protective Gear
Before commencing any repair work on your vehicle’s fender, it’s essential to prioritize safety by equipping yourself with the appropriate protective gear. Safety equipment safeguards you from potential hazards associated with bodywork repair, such as inhaling dust or coming into contact with chemicals. The following items should be part of your protective gear kit:
- Safety Goggles: To protect your eyes from flying debris, especially while sanding or grinding.
- Dust Mask or Respirator: A must-have to prevent the inhalation of dust particles and fumes from paint or filler materials.
- Disposable Gloves: Necessary to keep your hands clean and safe from abrasive materials and harsh chemicals.
- Long-sleeve Shirt and Pants: These cover more skin surface and provide an extra layer of protection against splinters and irritants.
- Ear Protection: If you’re using loud equipment like sanders or grinders, earplugs or earmuffs will help protect your hearing.
Wearing this gear throughout the repair process minimizes the risk of injury and long-term health issues, ensuring a safer DIY experience.
10 Methods How to Fix a Fender
1. Assess the Damage:
Begin by thoroughly assessing the extent of the fender damage. Identify if it’s a minor dent, a scratch, or a more significant issue. Understanding the severity of the damage will guide you in choosing the appropriate repair method.
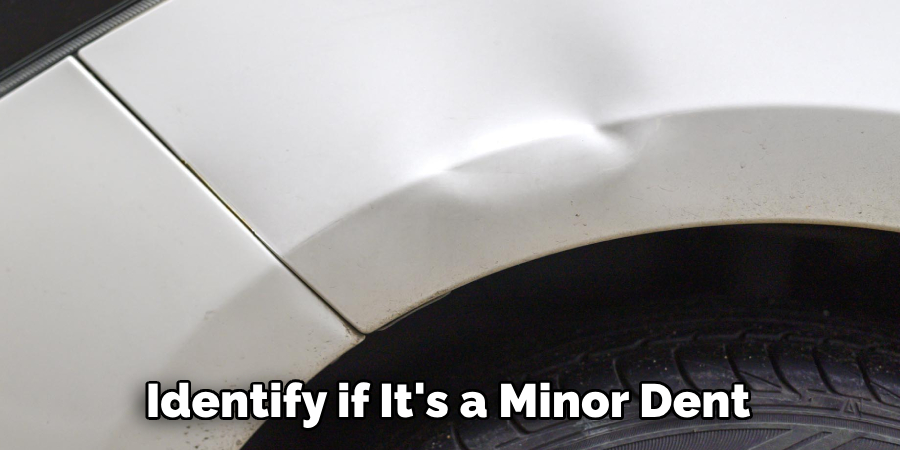
It’s important to also check for any hidden damages that may not be immediately visible. These can include damage to the underlying structure or suspension components of the vehicle. If you are unsure how to properly assess the damage, it’s best to seek the help of a professional mechanic.
2. Paintless Dent Repair (PDR):
For minor dents that haven’t compromised the paint, consider using paintless dent repair (PDR). PDR involves massaging the dent from the inside, often using specialized tools. This method is effective for small dents and helps preserve the original paint finish.
PDR is a popular option for minor dent repair due to its affordability and efficiency. It was first introduced in the 1960s and has since then become a widely used technique for repairing dents.
The process of PDR involves accessing the backside of the dent through small openings, such as door panels or wheel wells. Then, using specialized tools, technicians carefully push the dent out from the inside, restoring its original shape.
3. Using a Rubber Mallet:
For slightly larger dents, a rubber mallet can be a useful tool. Place a piece of wood on the inner side of the fender to support the dent area, then gently tap the outer side with the rubber mallet. This method helps reshape the metal without causing further damage.
If you are working with a dent that is slightly larger and more difficult to remove, using a rubber mallet can be very helpful. Unlike a hammer, which can cause further damage to the metal, the soft rubber material of a mallet is less likely to leave any new dents.
4. Bondo and Sanding for Smoothing:
Bondo, a two-part putty, is effective for repairing larger dents and shaping the fender’s surface. Apply Bondo to the damaged area, shape it to match the contour of the fender, and let it cure. Afterward, sand the Bondo until smooth, creating a seamless finish. For smaller dents, use a sanding block with 220-grit sandpaper to smooth out the surface.
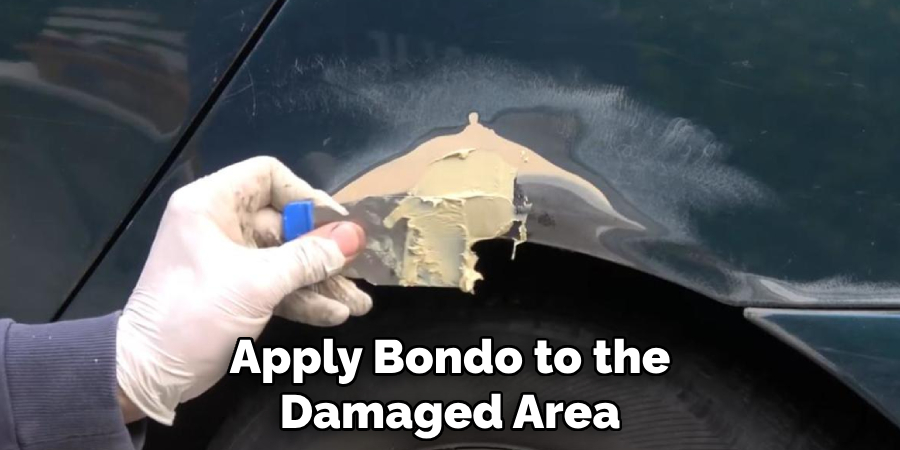
Sanding is an essential step in achieving a smooth and flawless finish on your fender repair. It helps remove any imperfections, bumps, or ridges that may have been left behind after using Bondo or other fillers. Additionally, sanding also helps prepare the surface for painting by creating a clean and smooth surface for the paint to adhere to.
5. Fender Pulling and Dent Removal Kits:
Fender pulling tools and dent removal kits are available for more complex dents. These kits typically include suction cups, pulling rods, and other specialized tools. Follow the kit’s instructions to pull the dent back into shape without damaging the paint.
Some kits may also include glue and tabs for dents that cannot be pulled out using suction cups. The glue is applied to the tab, which is then placed on the dent. The pulling rod is then attached to the tab and used to pull the dent back into shape.
6. Heat Gun for Paint Softening:
When dealing with dents, especially those with creases, a heat gun can be employed to soften the paint. Gently heat the damaged area and, using a rubber mallet or your hands, carefully massage the metal back into shape. This method is effective for addressing creases in the fender.
Another advantage of using a heat gun for paint softening is that it can also be used to remove stickers or decals from a vehicle’s surface. By heating up the adhesive, the stickers can be easily peeled off without damaging the paint.
7. Sanding and Repainting:
If the fender has scratches or chipped paint, sanding and repainting may be necessary. Use fine-grit sandpaper to smooth the damaged area, apply primer, paint, and clear coat to match the existing finish. This method ensures a seamless and professional-looking repair.
Sanding and repainting are essential steps in repairing damaged fenders. Not only does it improve the appearance of your car, but it also helps prevent further damage.
8. Fender Replacement:
In cases of extensive damage or irreparable dents, replacing the fender might be the most practical option. OEM (original equipment manufacturer) or aftermarket fenders are available. Follow the vehicle’s service manual for step-by-step instructions on fender replacement.
Aftermarket fenders are often cheaper than OEM fenders, but they may not fit as well or have the same quality as OEM parts. It is important to research and compare different options before purchasing a replacement fender.
9. Welding for Structural Repairs:
If the fender has suffered structural damage, welding may be required. This method is typically employed for more severe dents or damage that has affected the fender’s integrity. Consult with a professional welder or body shop for precise repairs.
Welding is a common method used for repairing structural damage on fenders. When a fender has sustained severe dents or has been compromised in its integrity, welding becomes necessary to restore its strength and functionality.
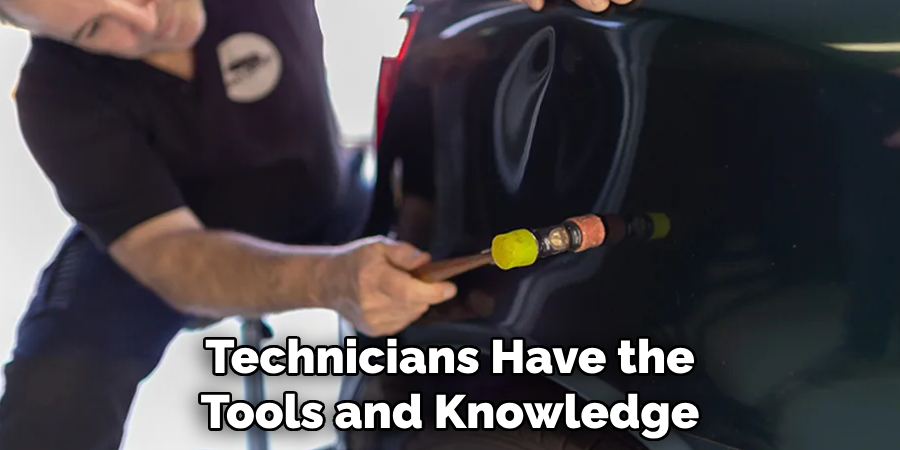
10. Professional Body Shop Repair:
For complex or severe fender damage, seeking the expertise of a professional body shop is advisable. Experienced technicians have the tools and knowledge to address intricate issues, ensuring a comprehensive and structurally sound repair.
Additionally, most body shops offer warranties on their work, providing peace of mind for future repairs.
Conclusion
In conclusion, mastering the techniques to fix a fender ensures the restoration of a vehicle’s appearance and structural integrity. By understanding the types and severity of fender damage and following the outlined repair techniques, individuals can effectively address dents, scratches, and cracks. Proper assessment, gathering necessary tools and materials, and adhering to safety precautions set the foundation for successful fender repairs.
Whether using dent pullers, body filler, or patching materials, it’s essential to approach the process with patience and attention to detail. Post-repair care, including allowing repaired areas to dry and applying protective coatings, ensures the durability and longevity of the repair. Hopefully, this article gave you some helpful tips about how to fix a fender successfully, so now that you have the proper knowledge on how to get the job done, why not give it a try today?

About
JeepFixes Team is a skilled author for Jeep Fixes, bringing 6 years of expertise in crafting a wide range of jeep fixes. With a strong background in jeep fixes work, JeepFixes Team’s knowledge spans various types of fixtures, from decorative pieces to functional hardware, blending precision with creativity. His passion for jeep fixes and design has made him a trusted resource in the industry.
Professional Focus:
Expert in Jeep Fixes : JeepFixes Team aesthetic specializes in creating durable and innovative jeep fixes, offering both appeal and functionality. His work reflects a deep understanding of jeep fixes techniques and materials.
Sustainability Advocate : He is dedicated to using sustainable practices, ensuring that every fixture is crafted with eco-friendly methods while maintaining high-quality standards.
In his writing for jeep fixes, JeepFixes Team provides valuable insights into the latest trends, techniques, and practical advice for those passionate about jeep fixes, whether they are professionals or DIY enthusiasts. His focus on combining artistry with engineering helps others discover the true potential of jeep in design.