

Bench bleeding a clutch master cylinder is a critical step in ensuring optimal performance and longevity of your vehicle’s hydraulic clutch system. Often overlooked, this process eliminates air bubbles trapped within the master cylinder, preventing spongy pedal feel and potential clutch engagement issues.

To begin, securely mount the master cylinder in a vise or hold it firmly in place. Next, attach bleeding hoses to the cylinder’s outlet ports, ensuring they reach into a container filled with brake fluid.
With the reservoir properly filled, slowly depress the master cylinder piston using a wooden dowel or similar tool, allowing air to escape through the hoses. Repeat this process until all air bubbles are expelled and only clean fluid flows through the lines.
Bench bleeding not only guarantees a smoother clutch operation but also simplifies the subsequent bleeding process when installing the master cylinder into the vehicle’s hydraulic system. Keep reading this blog post and we’ll take you through all the essential steps necessary for how to bench bleed a clutch master cylinder!
Importance of Bench Bleeding a Clutch Master Cylinder
Bench bleeding the clutch master cylinder is not a step to be skipped or taken lightly. Doing it properly is paramount to the performance and reliability of the clutch system. When air is present in the hydraulic lines, it can lead to an inconsistent clutch engagement, making gear shifting erratic or difficult.
In more severe cases, it can even prevent the clutch from disengaging entirely, leading to premature wear or failure of the clutch components. A meticulously bench-bled master cylinder ensures that the hydraulic system is working as efficiently as possible from the onset, reducing the risk of air-related complications and saving time and costs associated with future maintenance or repairs.
Understanding the Clutch Master Cylinder
The clutch master cylinder is an essential component of the hydraulic clutch system, acting as the primary source of pressure for clutch operation. It converts the mechanical force applied by your foot on the clutch pedal into hydraulic pressure, which then travels through the lines to the clutch slave cylinder.
From there, this pressure enables the slave cylinder to control the clutch mechanism, engaging or disengaging the clutch disc from the flywheel. This critical component’s performance hinges not just on proper installation, but also on ensuring it remains free of air and contamination.
Recognizing the function and pivotal role of the clutch master cylinder in your vehicle’s system is the first step in appreciating the importance of the bench bleeding process.

Components of the Clutch Master Cylinder
Each clutch master cylinder consists of several key components that work in unison to facilitate smooth and reliable clutch operation. The primary parts include the reservoir, which holds the brake fluid, and the piston assembly, which comprises the piston itself, return spring, and seals. The piston is the driving force that pushes the fluid into the hydraulic lines.
Seals within the cylinder prevent fluid leakage and maintain pressure integrity. Another crucial component is the pushrod, which connects the clutch pedal to the master cylinder, translating mechanical pedal input into hydraulic action. Understanding these components is crucial for maintaining the system and diagnosing any potential issues that may arise during use.
Preparing for Bench Bleeding
Before embarking on the bench bleeding procedure, it’s essential to gather the required tools and materials. This includes a bench vice to securely hold the master cylinder in place, clean brake fluid compatible with your vehicle’s specifications, bleeding hoses that fit the outlet ports, and a suitable container to catch the expelled fluid.
Additionally, you will need a wooden dowel or rod to actuate the master cylinder piston. Make sure to have a clean work area, as brake fluid can damage vehicle paint and other surfaces if spilled.
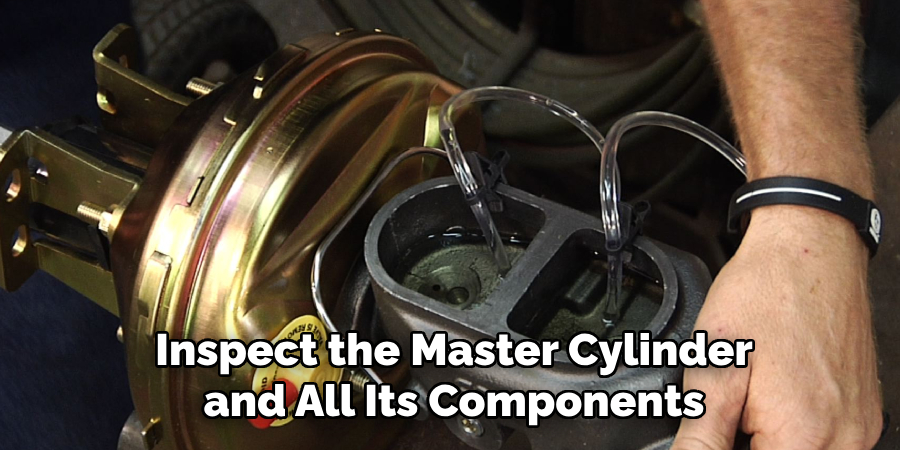
Prior to starting, inspect the master cylinder and all its components for any defects or damage to ensure the success of the bleeding process. Preparing your space and materials beforehand will streamline the task and minimize the potential for any setbacks.
Gathering Necessary Tools and Materials
To successfully bench bleed your clutch master cylinder, assembling the right tools and materials is crucial. Begin by securing a bench vise, which will firmly hold the master cylinder in place. You’ll also require an assortment of line wrenches or sockets to fit your vehicle’s specific bleed fittings.
Next, obtain quality brake fluid that meets the manufacturer’s recommended specifications for your clutch system. The bleeding procedure will also require clear tubing, which attaches to the bleed nipples and directs fluid into a catch container to monitor air expulsion. Additionally, source a blunt-ended rod or an appropriately-sized wooden dowel for actuating the master cylinder piston without damaging it.
Finally, make sure to have clean rags on hand to clean up any spills, as brake fluid can be corrosive and harmful to painted surfaces. With these tools and materials prepared, you’re ready to commence the bench bleeding process with confidence.
Precautions to Take Before Starting the Bench Bleeding Process
Prior to initiating the bench bleeding of a clutch master cylinder, certain precautions must be adhered to in order to ensure a safe and effective procedure. First and foremost, protect your eyes with safety goggles, as brake fluid can cause severe irritation or damage.
Gloves are also recommended to safeguard your skin from the corrosive nature of the fluid. Make certain that the work area is well-ventilated; brake fluid fumes can be harmful if inhaled in enclosed spaces. Additionally, it’s crucial to double-check that the master cylinder and all components are in perfect condition. Any presence of dirt, debris, or damage to the cylinder may compromise the bleeding process and the performance of the clutch system.
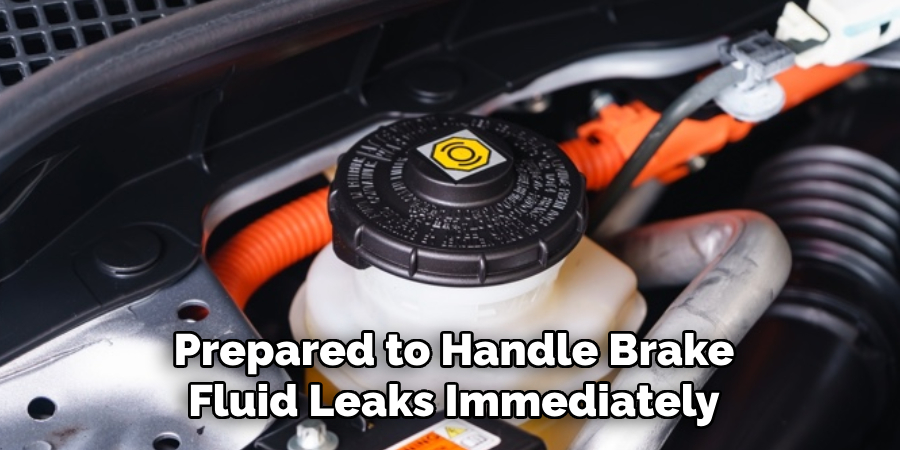
Furthermore, be prepared to handle brake fluid leaks immediately; have a clean-up kit with absorbent material at hand to protect your workspace. These precautions are vital in maintaining safety and ensuring the longevity and reliability of the clutch system after the bleeding is complete.
10 Steps How To Bench Bleed a Clutch Master Cylinder
1. Gather Necessary Tools and Materials:
Before starting the bench bleeding process, gather all the required tools and materials. You will need a bench vise or a sturdy holder to secure the master cylinder, a set of bleeding hoses compatible with the cylinder’s outlet ports, a container to catch the brake fluid, and a sufficient amount of brake fluid recommended by your vehicle’s manufacturer.
Additionally, prepare a wrench or socket set to loosen and tighten the fittings, a clean cloth, and safety glasses to protect your eyes from splashing brake fluid.
2. Prepare the Work Area:
Find a clean and well-ventilated work area where you can comfortably perform the bench bleeding procedure. Ensure that you have enough space to maneuver around the master cylinder and other components without any obstructions.
Before you begin, it is important to gather all the necessary tools and materials for the task. This includes a brake bleeding kit, a fresh bottle of brake fluid, appropriate wrenches or pliers, clean rags or towels, and a container to catch the old brake fluid as it is being bled from the system.
3. Remove the Clutch Master Cylinder:
If the clutch master cylinder is already installed in the vehicle, carefully remove it from its mounting location. Depending on the vehicle make and model, this may involve loosening bolts or removing other components to access the master cylinder. Once the master cylinder is fully accessible, disconnect any electrical connections or fluid lines attached to it.
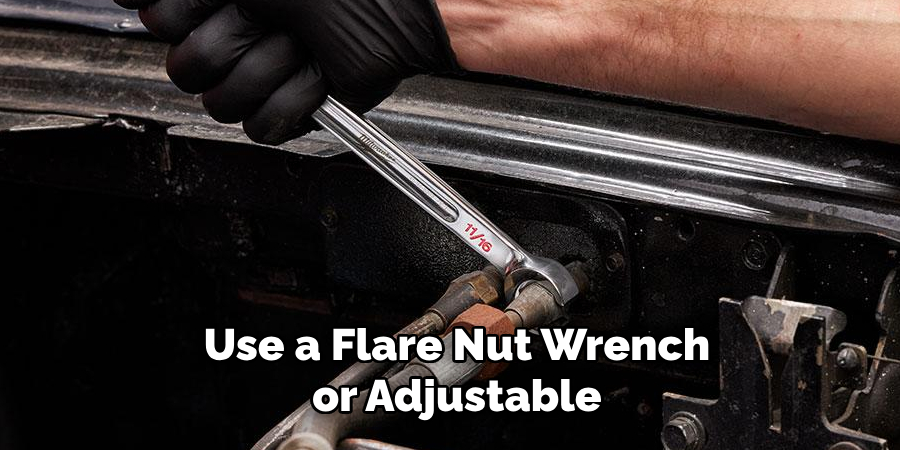
Once the master cylinder is disconnected, use a flare nut wrench or adjustable wrench to loosen and remove the fluid lines. Be sure to have a container ready to catch any excess fluid that may leak out. This will prevent it from spilling onto other components and potentially causing damage.
4. Secure the Clutch Master Cylinder:
Once removed from the vehicle, secure the clutch master cylinder in a bench vise or a holder designed for this purpose. Make sure it is firmly held in place to prevent any movement during the bleeding process.
When securing the clutch master cylinder, it is important to use a holder or bench vise that is specifically designed for this purpose. This will ensure that the cylinder is held securely and does not move during the bleeding process.
Additionally, it is recommended to use protective padding on the vise or holder to prevent any damage to the cylinder. The cylinder should be snugly fitted into the vise or holder, without being too tight.
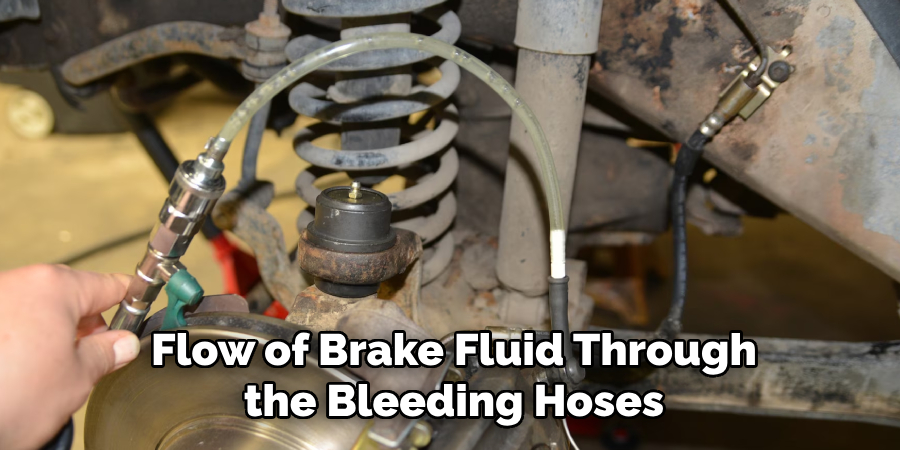
5. Attach Bleeding Hoses:
Identify the outlet ports on the clutch master cylinder. These ports are where the hydraulic fluid will be expelled during the bench bleeding process. Attach the bleeding hoses securely to each outlet port, ensuring a tight seal to prevent fluid leakage.
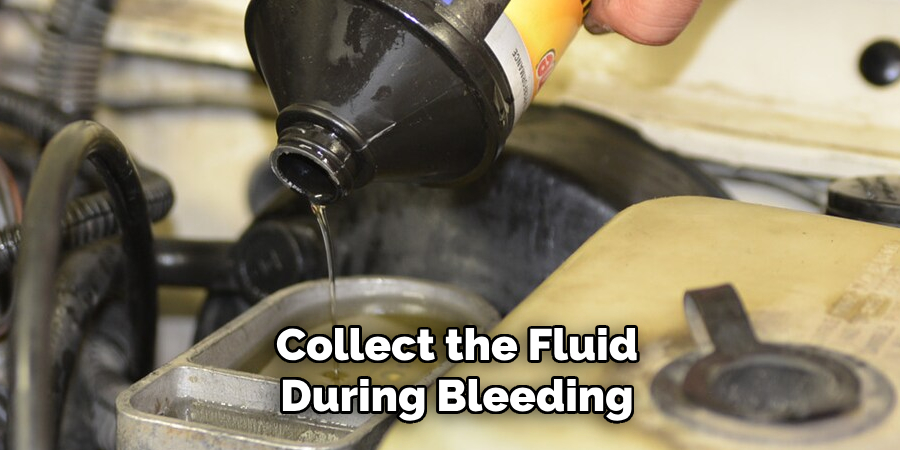
Once the hoses are attached, place the other ends of the hoses into a container to collect the fluid during bleeding. This will prevent any mess and make it easier to dispose of the old fluid later. However, if you do not have bleeding hoses, a clear plastic bottle or jar with a small opening can also be used to collect the fluid. Just make sure to create a tight seal between the container and the hose.
6. Fill the Reservoir with Brake Fluid:
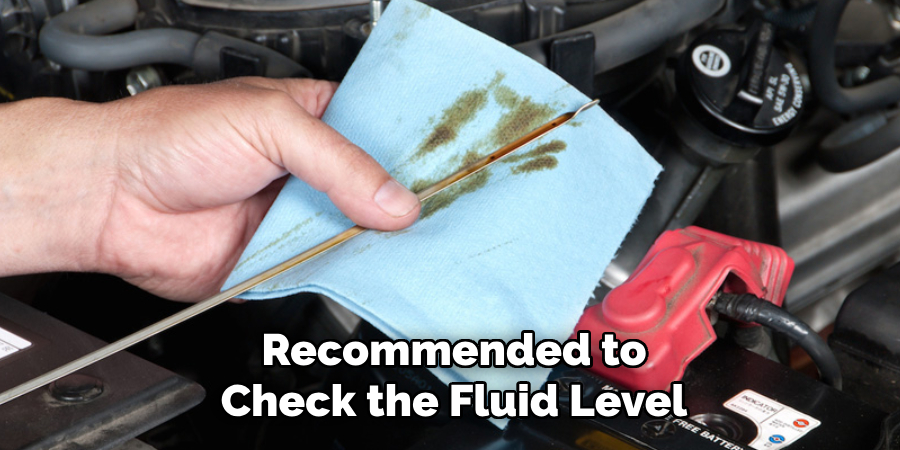
Check the fluid reservoir on the clutch master cylinder and ensure it is filled with the recommended type of brake fluid. Use a funnel to pour the fluid into the reservoir, taking care not to spill any fluid onto surrounding components. Once the reservoir is full, replace the cap and wipe away any excess fluid.
If your clutch master cylinder does not have a reservoir or the fluid level cannot be seen, you may need to consult the vehicle’s manual for instructions on how to fill the system. In some cases, you may need to add fluid directly into the slave cylinder instead. Again, refer to your manual for the correct procedure.
7. Depress the Master Cylinder Piston:
Using a suitable tool such as a wooden dowel or a similar implement, gently depress the master cylinder piston. Apply gradual pressure to the piston, allowing the trapped air bubbles to escape through the bleeding hoses. This process is known as “bleeding” the master cylinder and is essential for ensuring proper brake function.
After successfully bleeding the master cylinder, check the fluid level in the reservoir. If necessary, top off with fresh brake fluid. It’s important to use only a high-quality brake fluid recommended by your vehicle’s manufacturer. Using an inferior or incorrect type of brake fluid can have serious consequences on the performance of your brakes.
8. Monitor Fluid Flow:
As you depress the master cylinder piston, observe the flow of brake fluid through the bleeding hoses. Initially, you may notice air bubbles being expelled along with the fluid. Continue depressing the piston until you see a steady stream of fluid without any air bubbles. This process is known as bleeding the brake system, and it is essential for maintaining proper braking performance.
To ensure an accurate and efficient bleed, it’s important to use the correct tools and techniques. A vacuum pump or pressure bleeder can be used to speed up the process, but a simple bottle and hose setup can also do the job. It’s recommended to have a helper for this task, as they can assist in monitoring the fluid flow while you operate the master cylinder piston.
9. Repeat the Bleeding Process:
Depending on the size of the air bubbles and the effectiveness of the bleeding process, you may need to repeat the procedure multiple times until all the air is purged from the clutch master cylinder and the hydraulic lines. It is important to continue bleeding until a steady stream of brake fluid, with no air bubbles, is seen coming out of the bleeder valve.
To help with this process, you can use a clear hose attached to the bleeder valve and let it hang into a container filled with brake fluid. This allows you to see when all the air has been expelled from the system.
10. Inspect for Leaks and Proper Fluid Level:
Once you are satisfied with the bench bleeding process, carefully inspect the clutch master cylinder and the surrounding area for any signs of fluid leakage. Additionally, check the fluid level in the reservoir and top it up if necessary to ensure proper operation of the clutch system.
Regular maintenance of the clutch system is crucial for its proper functioning and longevity. It is recommended to check the fluid level and inspect for leaks every few months or as per your vehicle’s manufacturer guidelines
Troubleshooting and Tips:
When performing clutch master cylinder maintenance, you might encounter some common issues. Here’s how to address them:
- Persistent Air Bubbles: If air bubbles continue to appear in the fluid after multiple bleeds, ensure that the bleeding hoses are attached securely and there are no cracks or leaks. Sometimes the issue may be in the master or slave cylinder seals themselves.
- Low Fluid Pressure: Low pressure can be due to a blockage in the lines or insufficient fluid in the reservoir. Check for kinks or obstructions in the hydraulic lines and ensure the fluid level is adequate.
- Fluid Leakage: Any signs of leaking around the fittings could suggest that the connections are not tight enough or that washers and seals may need replacing.
- Soft Clutch Pedal: After bleeding the clutch master cylinder, if the pedal still feels soft or spongy, this could indicate that air is still in the system or that there is a problem with the cylinder.
If the standard bleeding process does not resolve your issues, consider these additional tips:
- Gravity Bleeding: This method involves opening the bleeder valve and allowing gravity to draw fluid through the system. It is a slower process, but it can be effective.
- Bench Bleeding: Sometimes, it’s best to remove the master cylinder and perform a bench bleed to ensure a more thorough removal of air bubbles.
- Professional Assistance: If you have tried the above methods and the issue persists, it might be time to seek help from a professional mechanic. There may be underlying issues that require specialized knowledge and skills.
Conclusion
In conclusion, bench bleeding a clutch master cylinder is a fundamental maintenance procedure that plays a crucial role in ensuring the optimal functioning of a vehicle’s hydraulic clutch system.
By following the detailed steps of how to bench bleed a clutch master cylinder, including securing the master cylinder, attaching bleeding hoses, and carefully monitoring fluid flow, air bubbles can be effectively purged from the system.
This eliminates the risk of spongy pedal feel and potential clutch engagement issues, enhancing the overall driving experience and safety on the road. Additionally, regular maintenance and attention to detail during the bench bleeding process contribute to the longevity of the clutch system and reduce the likelihood of costly repairs in the future.
With proper care and adherence to recommended procedures, drivers can enjoy smoother clutch operation and peace of mind knowing their vehicle’s hydraulic components are in optimal condition.